Call us: +86-137-2353-4866
Most people can tackle diy membrane switch repair with a smile. The process stays simple and safe, even for beginners. He saves money and feels proud when fixing membrane switches at home. She grabs SOUSHINE parts for her membrane switch and enjoys lasting results.
Table of Contents
Key Takeaways
- Membrane switches have layers that help control electronics. Knowing how they are built helps you fix problems.
- Some common problems are buttons that do not work and damage from water. Cleaning often can stop these problems.
- You can use a multimeter to check for circuit issues. This tool shows if a membrane switch is broken.
- Turn off the device before you start fixing it. This keeps you safe from electric shocks.
- Pick SOUSHINE membrane switches when you need new ones. Their sealed design keeps out water and dust.
- Clean your membrane switch often with isopropyl alcohol. This helps it work well and look nice.
- Look for damage like cracks or dents. Fixing these problems early stops bigger issues later.
- Repair in steps to make things easier. Finding the problem first helps you fix it better.
Membrane Switch Basics
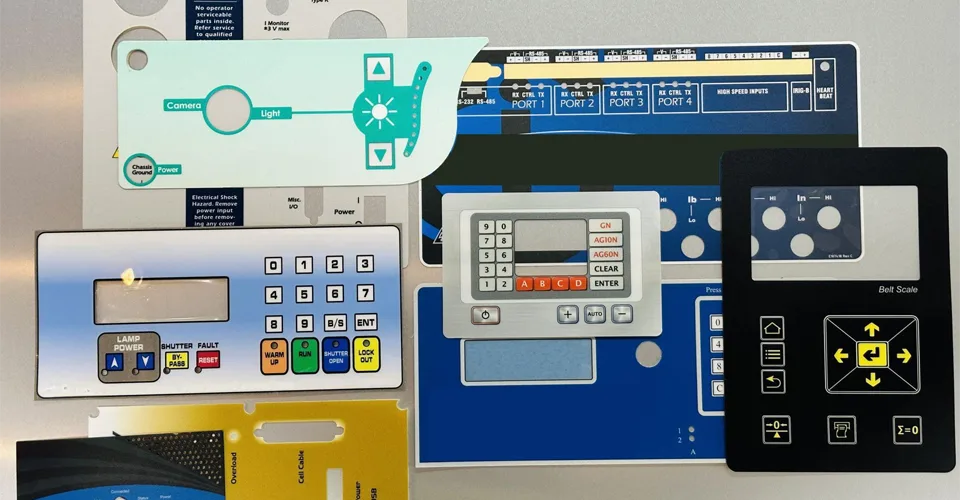
What Is a Membrane Switch
A membrane switch looks easy, but it is smart inside. He sees a flat panel with buttons and pictures. She pushes a button, and something happens below. The switch has thin, bendy layers that help people use things like microwaves, medical tools, and control panels.
A membrane switch has many layers. These include a graphic overlay, circuit layer, and adhesive layer. The usual parts are:
- Graphic Overlay: This is the top part with colors and designs.
- Overlay Spacer: This keeps layers from touching by accident.
- Dome Retainer: This holds the metal dome in one spot.
- Circuit Spacer: This makes space so the switch works right.
- Lower Circuit: This has lines that carry signals.
- Back Adhesive: This sticks the switch to other things.
SOUSHINE membrane switches are different from others. Their sealed design blocks water and dust. People use SOUSHINE when they need switches that work well and last long.
How They Work
He pushes a button on the membrane switch. The top layer bends down. The circuit layers touch, and a signal goes to the device. The switch works right away. She likes how smooth and fast it feels.
| Component | Description |
|---|---|
| Graphic Overlay | The top part you see, made from bendy stuff like polyester. |
| Circuit Layer | Has lines that send signals, made from silver or copper. |
| Circuit Tail | Connects the switch to the main device, making sure it stays put. |
| Back Panel | Gives support so all layers stay together. |
| Display Windows | Clear spots let you see screens below, and they do not scratch easily. |
| Backlighting & Indicators | Makes it easier to see in the dark using LEDs or EL panels. |
SOUSHINE membrane switches use strong materials. They work in hospitals, factories, and cars. Their sealed top keeps the inside safe. He knows SOUSHINE switches can handle lots of button presses.
Why They Fail
Membrane switches can have problems for many reasons. She sees a button that will not work. He finds a switch that feels soft and weak. Most problems happen because of bad design or weak materials.
- Bad sealant does not stop water or chemicals.
- Bad tail exits make the switch bend and break.
- Dual-circuit designs can cause stress and peeling.
- Too many layers can let dirt get inside.
- Weak materials make the top crack and domes break.
SOUSHINE membrane switches do not have these issues. Their sealed design and tough materials stop most failures. People choose SOUSHINE when they need switches that work in hard places.
Common Membrane Switch Problems
Unresponsive Buttons
He pushes a button. Nothing happens. She tries again. The button still does not work. Unresponsive buttons make people upset. This problem happens a lot in electronics. About 15-20% of people with ultrasonic cleaners see this problem in three years. The membrane switch just sits there and does nothing.
Unresponsive buttons can mean the membrane switch is broken. Sometimes, the conductive layer wears out. Other times, the key membrane rips. Bad circuit design can also cause problems. He thinks the switch might not work anymore. She wants to fix the button quickly.
A table shows common membrane switch problems:
| Problem | Symptoms | Causes | Solutions |
|---|---|---|---|
| Poor Touch Sensitivity | Buttons do not work | Conductive layer is damaged | Check and change layers |
| Air Bubbles or Wrinkles | Surface is bumpy, bad response | Material problems | Store better, replace |
| Fading or Peeling | Graphics wear off, weak feel | Sun damage, use | Use stronger coatings |
| Poor Waterproofing | Water inside, switch shorts | Bad sealing | Seal and test |
| Short Circuits | Errors, switch does not work | Circuit is broken | Fix or change circuit |
He gets his diy kit. She starts fixing the switch. They look for dirt, cracks, or faded spots. Cleaning sometimes helps. Other times, they need to fix the broken membrane switch. SOUSHINE switches fight these problems with strong and sealed parts.
Tip: If a button does not work, test the circuit with a multimeter. Change the switch if the circuit is bad.
Intermittent Issues
He pushes a button. It works once, then stops. She tries again. The button works, then fails. Intermittent issues are confusing. The membrane switch acts strange.
Loose connections, worn contacts, or water inside can cause problems. Sometimes, a shorted membrane switch makes random mistakes. He shakes the device. She taps the panel. The problem comes and goes.
To fix these issues, they check every layer. He looks at the tail exit. She checks for air bubbles. They clean the contacts and dry the switch. If it still does not work, they change the broken membrane switch.
Note: Intermittent problems often mean you need a new switch. SOUSHINE switches work well and have fewer problems.
Physical Damage
He drops his device. She hits the panel. Physical damage is bad. Cracks, dents, and scratches hurt the membrane switch. A broken membrane switch shows its damage.
Physical damage can cause shorted membrane switch problems. The circuit breaks. Buttons stop working. Sometimes, the graphic overlay comes off. He sees faded colors. She finds missing symbols.
To fix a broken membrane switch, they follow diy steps. First, they look for cracks or missing parts. Next, they clean the spot. If the damage is too much, they change the switch. SOUSHINE switches are tough and can handle drops and bumps.
Alert: Do not ignore physical damage. It can make buttons stop working or cause short circuits. Quick fixes keep devices working.
Moisture or Dirt
Moisture sneaks into places where it does not belong. Dirt hides in tiny cracks. He spills water on his control panel. She drops her snack crumbs near the buttons. The membrane switch does not like these surprises. Moisture and dirt cause trouble fast.
Water finds a way inside. It creeps under the graphic overlay. Dirt settles on the surface. He notices sticky buttons. She sees a faded display. The device acts strange. Sometimes, the membrane switch stops working. Other times, it starts a shorted membrane switch problem.
A table shows what happens when moisture or dirt attacks:
| Problem | What You See | What Causes It | How to Fix It |
|---|---|---|---|
| Sticky Buttons | Buttons do not pop up | Dirt under overlay | Clean with alcohol |
| Faded Graphics | Colors look dull | Water damage | Dry and replace overlay |
| Short Circuits | Device shuts off | Water inside layers | Dry and test switch |
| Unusual Sounds | Beeps or clicks | Dirt in contacts | Clean contacts |
He grabs his diy kit. She uses a cotton swab and isopropyl alcohol. They clean the surface. He dries the area with a soft cloth. She checks for water under the edges. If the problem stays, they look for a broken membrane switch.
Tip: Always power off before cleaning. Water and electricity do not mix.
Sometimes, moisture causes a shorted membrane switch. The device flashes or beeps. Dirt blocks the signal. He tries to repair a broken membrane switch by cleaning each layer. She removes the overlay and wipes away crumbs. They test the switch after repairing.
If cleaning does not help, they replace the switch. SOUSHINE membrane switches have a sealed design. Water and dirt cannot get inside. He likes how easy it is to repair. She trusts the sealed surface to keep her device safe.
He checks the device every month. She keeps food and drinks away from her control panel. They know that regular cleaning stops problems before they start. Repairing a membrane switch feels easy when they follow simple steps.
Note: Moisture and dirt cause most problems. Clean often and choose sealed switches for less trouble.
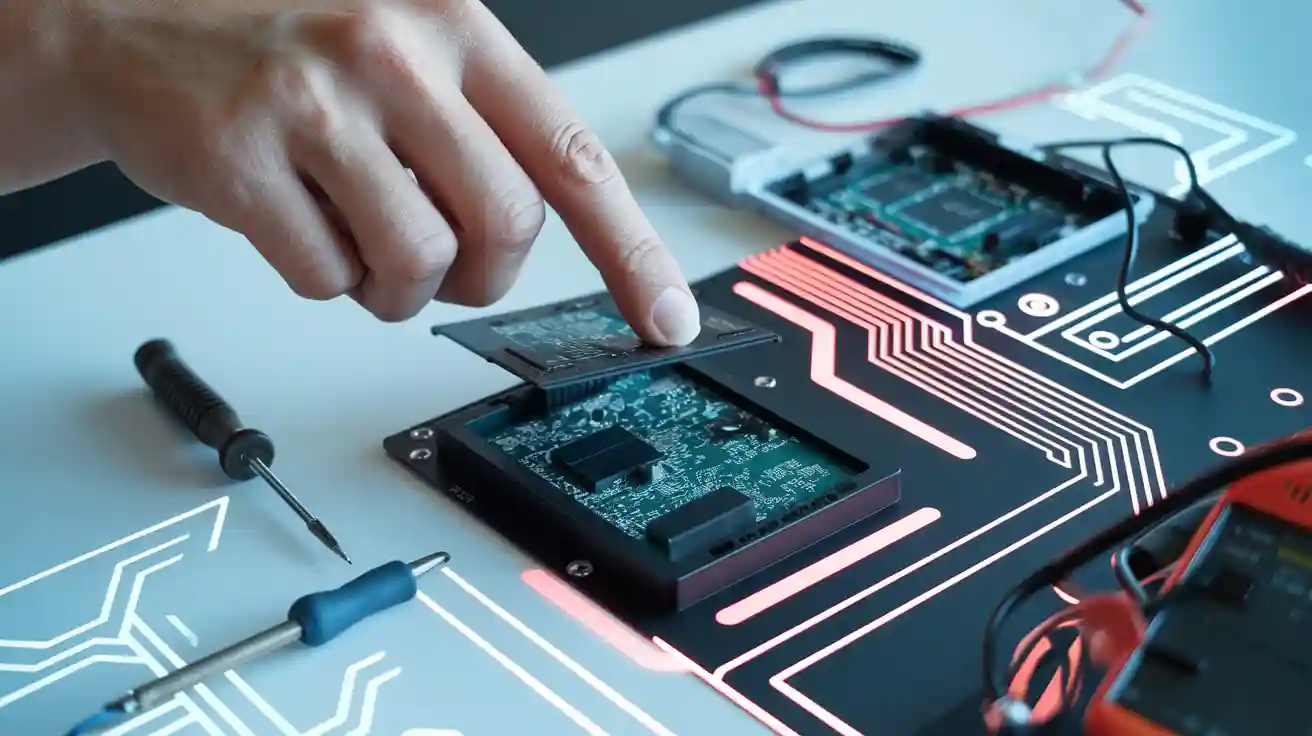
DIY Membrane Switch Repair Tools
Essential Tools
He opens his toolbox and smiles. She puts her tools on the table. Every diy repair needs the right tools to start. Here are the first things they pick:
- Screwdriver set – He opens the device case with no trouble.
- Multimeter – She checks for a shorted membrane switch or finds broken lines.
- Isopropyl alcohol – He cleans sticky spots and old dirt.
- Cotton swabs – She uses them to clean small spaces.
- Replacement overlay – He changes a faded or ripped graphic layer.
A multimeter helps them find a broken membrane switch early. Screwdrivers are useful for every part of the job. They both know the right tools make repairs easy.
Tip: Keep your tools in order. Looking for a missing screwdriver wastes time and makes you upset.
Cleaning Supplies
He spills soda on the control panel. She sees crumbs under the buttons. Cleaning supplies help fix these problems. The right cleaners keep the membrane switch working well and looking nice.
| Cleaning Supply | Purpose |
|---|---|
| Isopropyl alcohol | Cleans without hurting the switch |
| Electrical contact cleaner | Removes dirt from electronic parts |
| Microfiber or lint-free cloth | Wipes surfaces without scratching |
| Distilled water | Gentle cleaning if alcohol is not there |
He never uses steel wool or rough pads. She uses distilled water if she has no alcohol. They both know gentle cleaning keeps the switch safe.
Note: Do not use strong cleaners. They can hurt the surface and make repairs harder.
Replacement Parts
He finds a button that will not work. She sees a faded overlay that looks bad. Sometimes, cleaning and testing do not fix the problem. They need new parts to repair a broken membrane switch.
SOUSHINE membrane switches are the best choice for replacement. Their thin shape fits in small places. The sealed design keeps out dust, water, and chemicals. Cleaning is easy, even in busy kitchens or hospitals. The buttons feel good to press, so people use them with confidence. SOUSHINE switches also protect against EMI and ESD, which keeps devices safe. Developers like that they cost less and are easy to change.
| Advantage | Description |
|---|---|
| Thin and compact | Fits in small spaces |
| Customizable graphics | Matches any brand or device |
| Sealed against dust and moisture | Works in tough places |
| Easy to clean | Wipes down fast |
| Tactile feedback | Feels good to press |
| EMI/ESD protection | Shields sensitive electronics |
| Cost-effective | Saves money on repairs |
He picks SOUSHINE for his next repair. She trusts SOUSHINE to fix her device. They both know the right part makes repairs last longer.
Callout: When fixing, always check for a shorted membrane switch. Use SOUSHINE for a reliable and safe repair.
Safety Precautions
Before anyone grabs a screwdriver or pops open a device, safety precautions come first. He knows that skipping these steps can turn a simple repair into a shocking story. She always checks her workspace and tools before touching any membrane switch. These precautions keep everyone safe and help the repair go smoothly.
Power Off
He never forgets the first rule: unplug the device. She pulls the plug and waits a few minutes. Capacitors can hold a charge, even after the device powers down. Touching a charged part can give a nasty zap. He checks twice to make sure the device is off. She feels safer knowing the risk of electric shock is gone.
Tip: Always unplug the equipment and wait for the charge to drain. No one wants a surprise spark!
A quick checklist for powering off:
- Unplug the device from the wall.
- Wait at least two minutes.
- Double-check that all lights are off.
- Test with a multimeter if unsure.
He follows these precautions every time. She never skips this step, even when in a hurry.
Safe Handling
Static electricity loves to jump from fingers to sensitive parts. He wears a wrist strap and stands on an ESD mat. She grounds herself before touching any circuit. Static can fry a membrane switch in a flash. She knows that one spark can ruin hours of work.
He handles tools with care. Soldering irons get hot enough to burn skin or melt plastic. She keeps the iron away from flammable things. He reads the instructions for each tool. She never guesses how something works.
Callout: Static and heat are sneaky troublemakers. Handle every part with respect and patience.
A table of safe handling tips:
| Precaution | Why It Matters |
|---|---|
| Wear ESD wrist strap | Stops static from damaging parts |
| Use ESD mat | Protects the workspace |
| Handle soldering iron carefully | Prevents burns and fires |
| Read tool instructions | Avoids mistakes |
He remembers that proper handling keeps the membrane switch working longer. She knows that skipping precautions can lead to costly repairs.
Workspace Setup
She picks a clean, bright spot for her repair. He opens a window for fresh air. Soldering can make fumes that no one wants to breathe. He keeps drinks and snacks far from the workspace. She organizes her tools so nothing gets lost.
He checks for good lighting. She uses a lamp to see small parts. He keeps the area free of clutter. She puts away anything that could spill or catch fire.
Note: A tidy workspace makes repairs faster and safer. No one wants to search for a lost screw under a pile of junk.
A good workspace setup includes:
- Clean, flat surface
- Good lighting
- Ventilation (open window or fan)
- Tools within easy reach
- No food, drinks, or flammable items nearby
He follows these safety precautions every time he repairs a membrane switch. She trusts that careful setup and handling prevent most accidents. They both know that good precautions make every DIY project safer and more fun.
Step-by-Step Repair Process
Diagnose the Problem
He grabs his troubleshooting guide and starts the step-by-step repair process. She looks at the device and wonders why the buttons stopped working. Diagnosing a membrane switch problem feels like detective work. They check for unresponsive buttons, erratic behavior, ghosting, and physical damage.
- He checks the connection. The cable sits tight, and the plug fits well.
- She cleans the membrane switch with a soft cloth and a dab of isopropyl alcohol.
- He tests the continuity with a multimeter. The numbers jump, and he finds a shorted membrane switch.
- She inspects for cracks or loose parts. The overlay looks smooth, but one corner lifts.
Tip: Always start with a visual check. Many problems show up as faded graphics or sticky buttons.
He writes down what he finds. She marks the trouble spots. They know that a clear diagnosis makes the repair process easier.
Access the Switch
He wants to repair a broken membrane switch, so he opens the device. She finds the screws and removes them one by one. The cover lifts off, and the inside appears. They see the membrane switch sitting on top.
- He keeps the device on a flat surface. The keys stay safe, and the domes do not bend.
- She avoids flexing the switch. Bending can break the silver ink and ruin the circuit.
- He never creases the circuit tail. The connection stays strong, and the switch works better.
- She cleans the keypad surface with isopropyl alcohol before touching anything.
Note: Take your time. Rushing can damage the switch or lose tiny screws.
He sets the screws in a small cup. She lines up the parts for easy reassembly. They follow each step in the step-by-step guide.
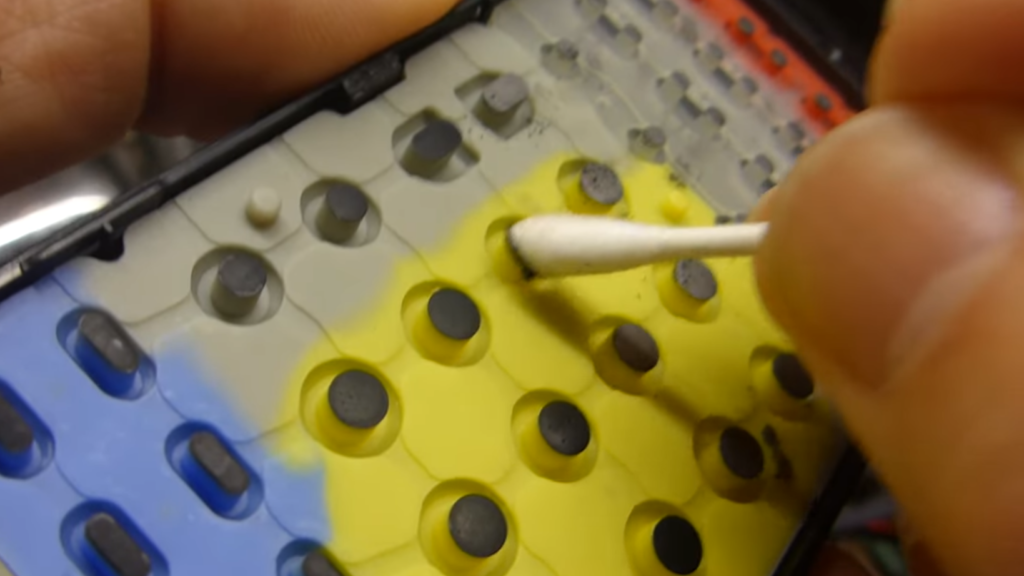
Clean the Switch
He sees dirt on the surface. She spots a sticky patch near the edge. Cleaning comes next in the repair process. They use gentle tools and safe cleaners.
- He uses isopropyl alcohol for quick drying. The switch looks clean, and the material stays safe.
- She moistens a soft towel with water. She wipes the switch, careful not to soak it.
- He grabs a soft toothbrush for stubborn spots. The bristles sweep away crumbs and grime.
- She never immerses the device in liquid. Only sealed switches like SOUSHINE can handle water.
| Cleaning Tool | Use Case |
|---|---|
| Isopropyl alcohol | Removes sticky residue |
| Soft towel | Wipes dust and dirt |
| Toothbrush | Cleans tight spaces |
Callout: Regular cleaning keeps the membrane switch working longer. SOUSHINE switches make cleaning easy with their sealed design.
He finishes cleaning and lets the switch dry. She checks for leftover moisture. They get ready for the next step in repairing.
Test Functionality
He finishes cleaning the membrane switch. She grabs her multimeter and starts the test. The repair process needs a good check before moving forward. They want to see if the buttons work and if the connection stays strong.
- He plugs the device in and powers it on.
- She presses each button one by one.
- He listens for beeps or clicks.
- She watches the display for any sign of life.
A table helps them track results:
| Button | Works | Needs Repair |
|---|---|---|
| Power | Yes | No |
| Start | No | Yes |
| Stop | Yes | No |
He uses the multimeter to check for a shorted membrane switch. She looks for any error codes. If a button fails, they mark it for repair. They know that troubleshooting saves time later.
Tip: Always test every button. One missed step can lead to more problems.
He feels proud when the device responds. She smiles when the display lights up. They move to the next step with confidence.
Repair or Replace
He finds a button that does not work. She sees a faded overlay. The repair process gives them two choices. They can repair a broken membrane switch or replace it with a new one.
He tries repairing first. She uses conductive ink to fix a broken trace. He presses the button again. Sometimes, the fix works. Other times, the damage is too much.
A quick checklist for repair:
- Clean the contact area.
- Apply conductive ink to broken spots.
- Let it dry.
- Test the button again.
If the switch stays broken, they choose replacement. SOUSHINE membrane switches make this step easy. He removes the old switch. She lines up the new one. The sealed design keeps out dust and water. The connection fits snug and secure.
A table shows their options:
| Action | When to Choose | Result |
|---|---|---|
| Repair | Minor damage | Quick fix |
| Replace | Major damage | Lasting solution |
He likes the simple swap. She trusts SOUSHINE for tough jobs. They finish repairing and get ready to reassemble.
Callout: When in doubt, replace the switch. SOUSHINE switches last longer and work better.
Reassemble
He gathers all the screws. She checks the parts. The repair process ends with reassembly. They want every piece back in place.
- He lines up the membrane switch with the device.
- She presses gently to avoid bending.
- He connects the circuit tail.
- She tightens each screw.
- He checks the connection one last time.
A table helps them stay organized:
| Step | Done? |
|---|---|
| Switch in | Yes |
| Tail connected | Yes |
| Screws tight | Yes |
| Cover on | Yes |
He powers on the device. She tests every button. The membrane switch works like new. They finish the repair and clean up the workspace.
Note: Double-check every connection before closing the device. A missed step can mean more troubleshooting later.
He feels proud of the repair. She enjoys the smooth buttons. They know that repairing saves money and keeps devices running.
Testing After Repair
Power On
He stands ready with the device in hand. She plugs the power cord into the wall. The moment feels electric—literally. They know the first step after any repair is to power on the device. He checks the display for signs of life. She listens for the familiar beep. The lights blink, and the screen glows. The device wakes up, eager for action.
A quick checklist helps them stay on track:
- Plug the device into the power source.
- Flip the switch or press the power button.
- Watch for startup lights or sounds.
- Wait for the device to finish booting.
He grins when the device responds. She nods, ready for the next step. Powering on sets the stage for a successful test the repaired membrane switch.
Check Buttons
Now comes the fun part. He presses each button with a gentle touch. She watches the screen for changes. The buttons click, beep, or light up. Each press tells a story. Some buttons start a timer. Others change the settings. He checks the backlighting. She looks for indicator LEDs. Every button must work as expected.
An ordered list keeps their testing smooth:
- Press each button one by one.
- Watch for a response on the display.
- Listen for beeps or clicks.
- Check if the backlighting or indicators turn on.
- Look for any strange behavior or missed presses.
He marks any button that feels sticky or slow. She notes if a button does not respond. They know that a good test the switch means the device is ready for action.
A table helps them track results:
| Button Name | Works? | Lights Up? | Needs Attention? |
|---|---|---|---|
| Power | Yes | Yes | No |
| Start | Yes | No | No |
| Stop | No | Yes | Yes |
He circles any problem spots. She plans a quick fix if needed.
Troubleshoot Again
Sometimes, a button refuses to cooperate. He sighs and grabs his troubleshooting guide. She checks the connectors for loose wires. They know that not every repair works on the first try. Troubleshooting keeps the adventure going.
An ordered list helps them solve stubborn problems:
- Inspect connectors for loose or corroded contacts.
- Clean exposed connectors with a soft cloth.
- Check the control board software for errors.
- Test the switch again after each step.
- If problems persist, consult a repair manual or call a professional.
He finds a loose wire and tightens it. She wipes away dust from the connector. The device springs back to life. They celebrate every victory, big or small.
Tip: Never give up after the first test. Sometimes, a second look finds the real problem.
He finishes the job with a smile. She feels proud of her work. Together, they know that careful testing and troubleshooting keep devices running strong.
Prevention Tips
Regular Cleaning
He grabs a soft cloth and wipes the panel. She checks for crumbs hiding near the buttons. Regular cleaning keeps every membrane switch feeling fresh and ready for action. Dirt and debris love to sneak into small spaces, but a quick routine stops trouble before it starts.
- Clean the membrane switch panel often to prevent dirt buildup.
- Handle devices gently and avoid pressing buttons too hard.
- Inspect the surface for sticky spots or faded graphics.
- Use isopropyl alcohol and a cotton swab for stubborn grime.
Tip: Gentle cleaning helps extend the life of any switch. He knows that a little care goes a long way in membrane switch maintenance.
Avoid Moisture
She spots a water ring near the control panel. He remembers the last time a spill caused chaos. Moisture can sneak into the tiniest crack and cause big problems. Keeping switches dry protects the circuitry and keeps devices running.
- Store devices in a dry place.
- Wipe away spills right away.
- Avoid using harsh chemicals or soaking the panel.
- Check for signs of water under the overlay.
- Keep food and drinks away from electronics.
A table helps track safe habits:
| Habit | Why It Matters |
|---|---|
| Dry storage | Stops corrosion |
| Quick cleanup | Prevents short circuits |
| No harsh cleaners | Protects overlays |
Alert: Moisture and electronics never mix. He always checks for leaks after cleaning. She keeps a towel nearby, just in case.
Upgrade to SOUSHINE
He wants a switch that stands up to busy days. She looks for a panel that shrugs off spills and dust. SOUSHINE membrane switches bring peace of mind with their sealed, rugged design. These switches handle millions of presses and keep working, even in tough spots.
- Sealed design blocks water, dust, and chemicals.
- Built for millions of actuations, so buttons last.
- Custom graphics match any brand or device.
- Cost-effective for repair and maintenance projects.
- Meets high IP ratings for splash-proof and waterproof needs.
- Resists harsh cleaning agents and solvents.
Developers love the freedom to design bold interfaces. SOUSHINE switches fit into medical, industrial, and consumer products with ease. He trusts the sealed surface to protect his device. She knows her panel will keep working, even after a spill.
Callout: Upgrade to SOUSHINE for a switch that laughs at dirt, dust, and water. He chooses SOUSHINE for every new project.
He fixes membrane switches with a smile. She follows each step and sees results. They clean often, treat switches gently, and exercise caution around soldering. Regular maintenance stops dust and dirt from causing trouble. He remembers to handle soldering iron with care. She joins others who share stories and tips.
“I have a Cardiozone Elite T treadmill with a bad membrane switch. The power button has worn out… I found a similar membrane here… but I will just relabel them. I’m not worried about the look of the thing, only the function.”
- Clean and lubricate switches.
- Adjust or replace buttons.
- Repair circuits or swap out the switch.
- Soldering brings new life to old devices.
He invites everyone to share questions and wins in the comments.
FAQ
How does someone know if a membrane switch needs replacing?
He presses a button. Nothing happens. She sees faded graphics. If cleaning and testing do not fix the problem, the switch needs replacing. A new SOUSHINE switch brings the device back to life.
Can anyone repair a membrane switch at home?
She grabs her toolkit. He follows simple steps. Most people can repair a membrane switch at home. The process stays safe and easy. No special skills needed. Just patience and care.
What tools help with membrane switch repair?
He uses a screwdriver to open the device, a multimeter to test the circuit, and cotton swabs to clean specific spots. She assists by cleaning with isopropyl alcohol. These are the essential tools: the screwdriver is for opening the device, the multimeter is for checking the circuit, and the swabs are for targeted cleaning.
Why choose SOUSHINE membrane switches for replacement?
He wants a switch that lasts. She likes easy cleaning. SOUSHINE switches block water and dust. The sealed design keeps devices safe. Buttons feel good and work every time.
What causes buttons to stop working?
She finds dirt under the overlay. He sees water damage. Common causes include dirt, moisture, and worn circuits. Regular cleaning helps. Sometimes, only a new switch solves the problem.
Is it safe to clean a membrane switch with water?
He uses a damp cloth, not a wet one. She avoids soaking the panel. Water can damage the switch. Isopropyl alcohol works better. SOUSHINE switches resist spills but still need gentle cleaning.
How often should someone clean a membrane switch?
She wipes the panel every week. He checks for crumbs and dust. Regular cleaning keeps buttons working. A quick routine prevents trouble. Devices stay fresh and ready.
What should someone do if a button works sometimes but not always?
He tests the circuit with a multimeter. She cleans the contacts. Intermittent issues mean loose connections or dirt. If problems stay, a new SOUSHINE switch fixes it for good.