Call us: +86-137-2353-4866
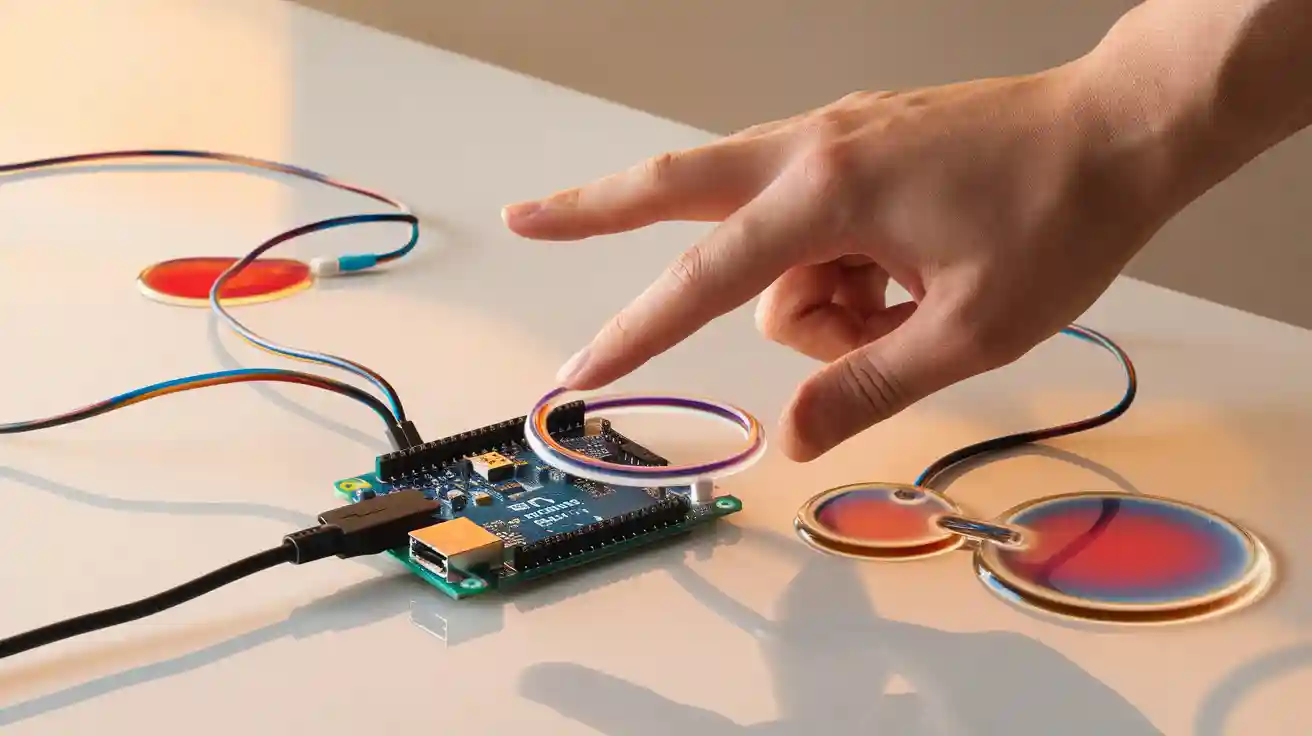
Learning how to use FSR with Arduino is essential for accurate force measurement projects. You start by connecting the force sensing resistors to the board, writing code to read sensor values, and testing the results. Common issues such as wiring mistakes, calibration errors, and sensitivity adjustments are outlined in the table below:
| Challenge | Description |
|---|---|
| Wiring | Beginners may have a hard time setting up, especially when connecting the FSR to a breadboard. |
| Calibration | You need to calibrate it right to get good readings, but this can be hard for beginners. |
| Sensitivity adjustments | Picking the right resistor for the sensitivity you want can be confusing for new users. |
SOUSHINE gives reliable force-sensing solutions for projects that use force sensing resistors in real life.
Table of Contents
Key Takeaways
- Connect the force sensitive resistor (FSR) to Arduino. Use a voltage divider circuit for better readings.
- Calibrate the FSR with weights you know. This helps make measurements more accurate. It also helps you make a good calibration curve.
- Pick the right resistor value, like 10kΩ. This matches how sensitive your project needs to be.
- Test the FSR by looking at analog readings on Arduino. This helps you see how it reacts to different forces.
- Do not make common mistakes like wrong wiring or loose connections. This helps you get correct sensor readings.
- Use the Arduino IDE to upload code. The code reads and works with the FSR data well.
- Try beginner projects like controlling LEDs. You can also make a thumb-wrestling game to practice using FSRs.
- SOUSHINE FSRs last a long time and use little power. They work well for many electronics and robotics projects.
Force Sensitive Resistor Basics

What is an FSR
A force sensitive resistor is a sensor that changes resistance when you press it. This sensor helps measure force in many electronics projects. Scientists call it a pressure-sensitive device. It has layers made of plastic and materials that conduct electricity. When you push on the sensor, the resistance goes down. More of the sensor touches the part that carries electricity.
- A force sensitive resistor is a material that changes resistance when you press or squeeze it.
- FSRs are used in robotics, healthcare, and electronics.
- The sensor reacts to touch, squeeze, or weight.
FSRs help people make devices that respond to physical actions. These sensors are important for products that need to sense force or pressure.
How FSR Works
FSRs act like resistors that change. They use piezoresistive sensing technology. If you do not press on it, the resistance is very high. When you press on it, the resistance drops fast. The table below shows how resistance changes in different cases:
| Condition | Resistance |
|---|---|
| No load | Several Megaohms (MΩ) |
| With load | Several Kiloohms (KΩ) |
The link between force and resistance matters. Some models show a clear connection between the weight you put on and the resistance you measure. FSRs do not give exact force numbers, but they show changes in pressure. This makes them good for sensing touch or weight.
FSRs are passive parts. They do not need extra power to sense force. The sensor lets more current flow when you press harder.
FSR Types
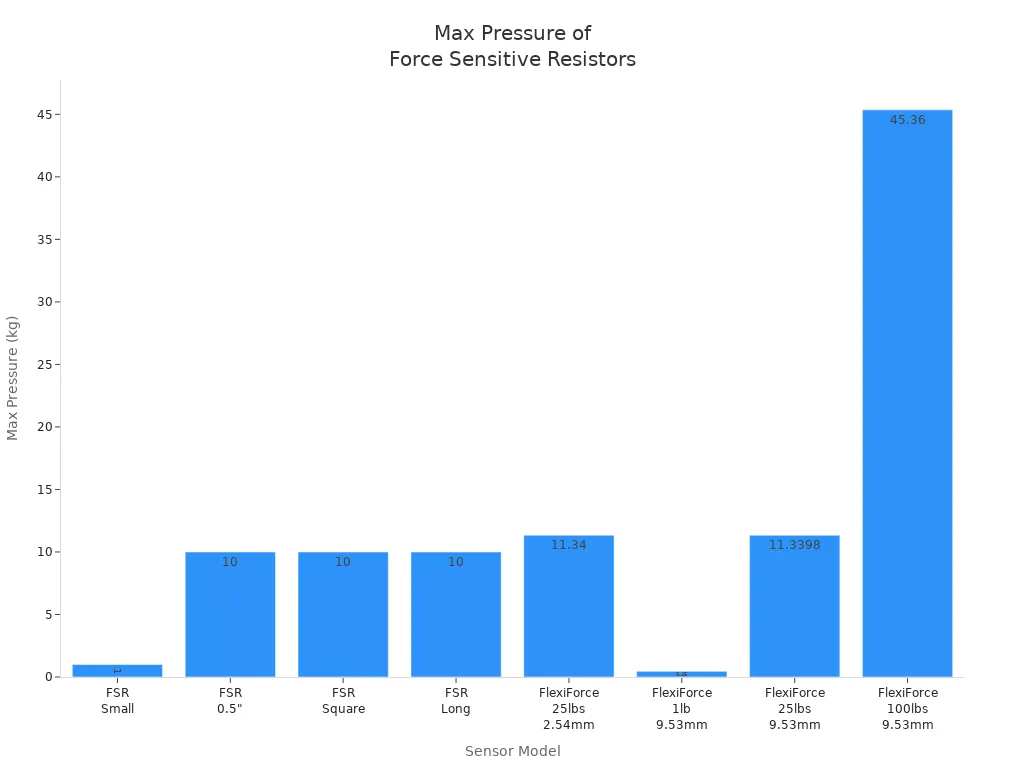
There are many kinds of force sensing resistors. Each kind has a different shape, sensing area, and pressure range. The table below lists common FSRs and their details:
| Name | Shape | Sensing Area | Min Pressure | Max Pressure |
|---|---|---|---|---|
| Force Sensitive Resistor – Small | Circular | 7.62 mm dia | 0.1 kg | 1 kg |
| Force Sensitive Resistor 0.5″ | Circular | 12.7 mm dia | 100 g | 10 kg |
| Force Sensitive Resistor – Square | Square | 44.45 x 44.45 mm | 100 g | 10 kg |
| Force Sensitive Resistor – Long | Rectangular | 6.35 x 609.6 mm | 100 g | 10 kg |
| FlexiForce Pressure Sensor – 25lbs | Circular | 2.54 mm dia | 0 g | ~11.34 kg |
| FlexiForce Pressure Sensor – 1lb. | Circular | 9.53 mm dia | 0 g | ~0.45 kg |
| FlexiForce Pressure Sensor – 25lbs. | Circular | 9.53 mm dia | 0 g | ~11.3398 kg |
| FlexiForce Pressure Sensor – 100lbs. | Circular | 9.53 mm dia | 0 g | ~45.36 kg |
FSRs come in two main types: Shunt Mode and Thru Mode. Shunt Mode FSRs sense a wide range of pressure and work well for high-pressure jobs. Thru Mode FSRs sense light pressure and are good for precise tasks, like robotic arms or musical instruments. Each type works best for different needs in electronics and engineering.
Arduino Board and Components
Required Parts
You need a few main things for this project. Here is what you should get before you start:
- 1x 40mm Force Sensing Resistor
- 1x 4.7kΩ Resistor
- 1x arduino board (Uno model recommended)
- 5x Jumper Wires (Male-to-Male)
- 1x Mini Breadboard
- 1kg Calibrated Masses Kit
Each item helps you build the circuit. The force sensitive resistor senses pressure. The resistor controls how sensitive the sensor is. The arduino board checks the sensor’s readings. Jumper wires link all the parts together. The breadboard keeps everything in place. Calibrated masses let you test and set up the sensor.
Tip: Put all your parts in order before you start wiring. This makes things faster and helps you avoid errors.
Choosing Arduino Board
The arduino board is like the project’s brain. The Arduino Uno is a good choice for this kind of project. It is easy to wire and set up. The Uno lets you use a voltage divider circuit with the force sensitive resistor and a 4.7kΩ resistor. This setup checks voltage changes when you press the sensor. The arduino board reads these changes and tells you how much force you use.
Other arduino boards, like Nano or Mega, can also work. But the Uno is popular because it is simple and works well. The arduino board connects to your computer for programming and testing. It has analog pins to read the sensor. The Uno fits most breadboards and works with many sensors.
Optional Tools
Some tools make building and testing easier. The table below shows items that help you do the project better:
| Item Description | Price | Link |
|---|---|---|
| 40mm Force Sensing Resistor | $10.00 | Our Store |
| 4.7kΩ Resistor | $12.00 | Amazon |
| Arduino Uno Board | $13.00 | Our Store |
| Jumper Wires (Male-to-Male) | $0.45 | Our Store |
| Mini Breadboard | $3.00 | Our Store |
| Calibrated Masses Kit | $16.50 | Amazon |
A calibrated masses kit helps you test the sensor. A mini breadboard keeps your circuit tidy. Jumper wires make it easy to connect things. The arduino board works with these tools to make a working sensor system.
Note: These extra tools help you get better results and make setup easier, but you can still do the project with just the main parts.
Wiring FSR to Arduino
FSR Pinout
A force sensitive resistor usually has two pins. These pins help the sensor measure force in a circuit. One pin goes to the power supply, which is often 5V from the arduino. The other pin connects to an analog input, like A0, and also to a resistor that goes to ground.
- When the fsr’s resistance gets lower, the voltage at A0 goes up.
- The fsr and a resistor work together in a voltage divider.
- The arduino checks the voltage across the resistor.
- If you do not press the fsr, the voltage at A0 stays near zero.
- If you press the fsr, the voltage at A0 can go up to 5V.
This pin setup lets you connect the sensor to the arduino and see force changes.
Voltage Divider Setup
The voltage divider circuit is needed to use force sensitive resistor sensors with microcontrollers. This circuit turns the fsr’s changing resistance into a voltage the arduino can read. You use a resistor with a set value in series with the fsr.
- A voltage divider with an fsr gives a changing voltage for the analog-to-digital converter.
- The voltage divider lets the arduino sense how much force is on the sensor.
- The link between the fsr’s resistance and force helps get good readings.
- A 10 kΩ resistor works for most projects. This matches the fsr’s range, which can go from 250 Ω to 30 kΩ.
- The voltage divider is needed to turn signals from resistive sensors into voltages the arduino can read.
Here is a table with resistor values for different sensitivity needs:
| Resistor Value | Sensitivity Range | Use Case |
|---|---|---|
| 3.3 kΩ | High force sensitivity | Heavy pressure sensing |
| 4.7 kΩ | Medium sensitivity | General applications |
| 10 kΩ | Wide range | Initial testing |
Tip: Pick a resistor value close to the fsr’s unpressed resistance for best results.
Common Mistakes
Many people make mistakes when using fsr sensors with arduino. These mistakes can mess up the readings and how the sensor works.
- Wrong wiring can make the analog-to-digital converter show zero.
- Using a resistor that does not fit the fsr’s range can make measurements less accurate.
- A lower resistor value makes the sensor more sensitive to strong forces.
- A higher resistor value makes the sensor more sensitive to light forces.
- Loose wires can make the readings jump around.
- You need to connect 5V to the fsr, then to A0, and use a resistor from A0 to ground.
Follow these steps to wire the force sensing resistor, the resistor, and the analog pin:
- Attach one fsr lead to the 5V pin on the arduino.
- Attach the other fsr lead to the analog pin A0.
- Put a 10 kΩ resistor between A0 and ground.
- Make sure all wires are tight and secure.
FSR Lead 1 → 5V
FSR Lead 2 → A0
A0 → 10 kΩ resistor → GND
Note: Good wiring and picking the right resistor are key for using force sensitive resistor sensors with arduino.
Arduino Code for FSR
Sample Code
The Arduino board can read values from the force sensing resistor. It uses a voltage divider circuit to do this. The code below shows how to use fsr with arduino. It prints resistance values to the serial monitor.
// RP-S40-SR Force Sensing Resistor
// Printing out resistance values from the voltage divider

int FSR_pin = A0; // select the input pin for the potentiometer
int avg_size = 10; // number of analog readings to average
float R_0 = 4700.0; // known resistor value in [Ohms]
float Vcc = 5.0; // supply voltage

void setup() {
  Serial.begin(9600);
}

void loop() {
  float sum_val = 0.0; // variable for storing sum used for averaging
  float R_FSR;
  for (int ii=0; ii<avg_size; ii++){
    sum_val += (analogRead(FSR_pin)/1023.0)*5.0; // sum the 10-bit ADC ratio
    delay(10);
  }
  sum_val /= avg_size; // take average

  R_FSR = (R_0/1000.0)*((Vcc/sum_val)-1.0); // calculate actual FSR resistance

  Serial.println(R_FSR); // print to serial port
  delay(10);
}
This code lets you get analog readings from the fsr. You can see how resistance changes when you press on the sensor.
Code Explanation
The code uses analogRead() to get input from the force sensitive resistor. The voltage divider circuit connects the fsr with a fixed resistor. The Arduino checks voltage changes when you press the sensor. The analog reading from the fsr gives a number from 0 to 1023. The code averages ten readings to make the results smoother. The calculation finds the resistance of the fsr using the known resistor and supply voltage.
FSR_pinpicks the analog pin for the sensor.avg_sizesets how many readings to average.R_0is the value of the fixed resistor.Vccis the supply voltage.- The
setup()function starts serial communication. - The
loop()function gets readings, averages them, and finds resistance. - The code prints the resistance value to the serial monitor.
The analog reading from the fsr can control other things, like changing the brightness of an LED. The value goes up or down as you press the sensor. The Arduino uses this value to make choices in your project.
Uploading Code
Uploading code to the Arduino board takes a few steps. These steps help you use fsr in your projects.
- Download and install the Arduino IDE software from the official website.
- Plug the Arduino board into your computer with a USB cable.
- Open the Arduino IDE and paste the code into a new sketch.
- Click the checkmark at the top left to check the code.
- Press the Upload button to send the code to the Arduino board.
- Open the Serial Monitor to see resistance values from the force sensing resistor.
These steps let you test and use fsr with arduino. You can see how the sensor reacts when you press or squeeze it.
Use FSR: Testing and Calibration
Testing Readings
Testing the fsr lets you see how it reacts to touch. The arduino reads numbers from the sensor. These numbers change when you press the sensor. The analog readings show how much force is on the sensor. The table below shows what numbers you might see for different forces:
| Force Range | Analog Reading Range |
|---|---|
| 10g – 10kg | Not calibrated |
| 20g – 1.1kg | Expected range |
You press the sensor and watch the numbers on the serial monitor. The sensor can feel both light and hard presses. The analog readings help you learn how the sensor works before you start calibration.
Calibrating FSR
Calibration makes the pressure sensor more accurate. You use weights you know to match force with the sensor’s output. Here are the steps for calibration:
- Get the weights you need for calibration.
- Put the weights on the 3D printed platform above the force sensing resistor.
- Use arduino to measure the resistance from the fsr.
- Make a curve that matches resistance to mass using a log-log linear fit.
- Test the curve to make sure it fits well.
The calibration uses gravity and special weights. A 3D printed plate helps spread the force evenly. The fsr’s resistance matches the weight you put on it. This makes a calibration curve for the sensor. The curve helps you guess the force from the sensor’s readings. Calibration gives good measurements for different weights. You repeat calibration with more weights to make the curve better. This process helps the sensor give better force readings.
You can use the calibration curve to change an led’s brightness or control other things. Calibration makes the sensor more helpful in projects. The method helps you get the same results each time. The curve is important for measuring force the right way.
Troubleshooting
Troubleshooting helps you fix problems with the sensor and calibration. The table below lists common ways to solve problems:
| Troubleshooting Step | Description |
|---|---|
| Check Connections | Make sure the fsr is connected right and wires are not loose. |
| Circuit Configuration | Check that the voltage divider is set up the right way. |
| Calibration | Use known weights to make a calibration curve for the fsr. |
| Code Verification | Make sure the code reads the analog input the right way. |
| Temperature Compensation | Add software to fix changes from temperature. |
You check the wires and make sure the voltage divider works. You use calibration to fix errors in measurement. Checking the code helps arduino read the sensor right. Temperature compensation helps the sensor work in hot or cold places. Troubleshooting keeps the sensor and calibration working well.
FSR Project Ideas
Beginner Projects
Lots of people begin with easy force sensing projects. These projects help you learn how sensors work with electronics. Here are three ideas for beginners:
- Control LEDs: You can press an fsr to change how bright an LED is. The sensor checks how hard you press. The Arduino reads this and changes the light.
- FSR Thumb-Wrestling: Two players use sensors to see who presses harder. The Arduino looks at both forces and shows who wins.
- Tapper Musical Interface: You tap your fingers on the sensor to play sounds. The Arduino senses the taps and makes music.
Tip: Try one project first to see how the sensor reacts to touch.
Real-World Applications
Force sensing resistors are used in many places outside school. People use them in different jobs to measure and react to pressure.
- Ergonomic tools use sensors to check how much pressure someone uses. This helps make things safer and more comfortable.
- Rehabilitation centers use sensors to watch force during therapy. The data helps therapists plan exercises.
- Interactive displays use sensors to respond to touch. This makes art and exhibits more fun.
These examples show how sensors help in everyday life and special places.
Expanding Projects
Once you know the basics, you can make your projects better. You can make them more accurate and add new things.
- You can record sensor values when there is no force. This sets a starting point and helps fix changes in the environment.
- You can use known weights and make a calibration curve in the code. This makes the readings more exact.
- A moving average filter in the software can make the data smoother.
- A soft load concentrator can spread force over the sensor.
- You can try different resistor values to change how sensitive the sensor is.
- Non-linear mapping or lookup tables in the code can help control devices better.
Note: Each step helps you build projects that work better and last longer.
SOUSHINE FSR Features
Product Overview
SOUSHINE makes force sensing resistors for many jobs. These sensors can measure force and pressure. The company sells sensors in many shapes and sizes. This helps engineers put them in lots of devices. Each sensor has a simple design with no moving parts. This means the sensor does not wear out fast and lasts longer. SOUSHINE builds its sensors to work in tough places. The sensors use very little power, so they are good for battery devices.
The table below shows how SOUSHINE force sensing resistors compare to other brands:
| Feature | SOUSHINE | Other Brands |
|---|---|---|
| Customizability | Yes (various shapes/sizes) | Varies by brand |
| Power Consumption | Low | Varies by brand |
| Integration | Easy | Varies by brand |
| Robust Design | Suitable for harsh environments | Varies by brand |
| Sensitivity | High (measures small forces) | Varies by brand |
| Reliability | Noted for precision | Varies by brand |
Key Advantages
SOUSHINE force sensing resistors have many good points. The sensors use little power, so they work well in things that use batteries. Their simple design makes them easy to add to different systems. The sensors do not have moving parts, so they last longer and do not break easily. They are thin, so you can put them in small spaces.
SOUSHINE force sensing resistors help engineers make products that work well and do not cost too much.
The table below lists some main advantages:
| Benefit | Description |
|---|---|
| Durability and Reliability | No moving parts, less wear, and protection from corrosive elements. |
| Design Simplicity | Simple structure, fewer failure points. |
| Cost-Effectiveness | Lower cost than complex sensors, good for budget projects. |
| Compact Integration | Thin design, fits in tight spaces. |
- These sensors use little power, so they are great for battery-powered devices.
Application Areas
SOUSHINE force sensing resistors are used in many fields. The sensors help in medical tools, factory machines, cars, electronics, and robots. Each field uses the sensors in its own way.
The table below shows some common uses:
| Industry | Specific Use Cases |
|---|---|
| Medical Devices | Drug-delivery devices, micro-needle drug-delivery |
| Industrial Equipment | Pressure mapping in food packaging, airbag calibration |
| Automotive Systems | Airbag systems, door seal pressure checks |
| Consumer Electronics | Touchpads, game controllers, electronic drum kits |
| Robotics and Automation | Flexible wearable sensors for health tracking |
SOUSHINE force sensing resistors give good and steady data in all these areas. The sensors help make things safer, easier to control, and better for users.
To use a force sensitive resistor with Arduino, you do three things. First, you connect the FSR and a 4.7kΩ resistor in a voltage divider. Next, you upload code to the Arduino to read resistance. Then, you test and set up the sensor with weights you know. You can try new projects and get better at using sensors. If something does not work, check your wires and make sure the code is right. SOUSHINE FSRs work well and give help for many uses.
FAQ
How does a force sensitive resistor work with Arduino?
A force sensitive resistor changes resistance when you press it. The Arduino checks this change and turns it into voltage. The board shows how much force you use by changing the voltage into a number.
What resistor value should someone use with an FSR?
Most people use a 10kΩ resistor for their projects. This value is good for sensing force in general. You can also use 4.7kΩ or 3.3kΩ to change how sensitive the sensor is. Pick the resistor based on how much force you want to measure.
Can someone use more than one FSR with Arduino?
Yes, you can use more than one sensor. The Arduino board has many analog pins. Each pin can read a different force sensitive resistor. You connect each sensor to its own analog input.
Why does the FSR reading jump or stay at zero?
If the wires are loose or not connected right, the readings can jump or stay at zero. Check all the wires and make sure the voltage divider circuit is set up correctly. Tight connections help the sensor work better.
How can someone calibrate an FSR for accurate force measurement?
Put weights you know on the sensor. Write down the readings you get. Make a table or graph to match the force to the sensor’s output. Calibration helps the sensor give more exact results.
What real-world projects use FSRs?
Force sensitive resistors are used in medical devices, game controllers, and robots. They help measure touch, pressure, or grip. Many jobs use them for safety and control.
Is SOUSHINE FSR suitable for outdoor or harsh environments?
SOUSHINE force sensitive resistors have a strong design. They work well in tough places. The sensors last a long time and use little power. This makes them good for outdoor and factory projects.