Call us: +86-137-2353-4866
Anyone can make a project with a piezoelectric sensor. This guide gives easy steps and real examples. You will learn how to connect, test, and use these sensors. Many people pick a force sensing resistor because it is thin and uses little power. SOUSHINE FSRs can handle many presses, so they are a good choice for force sensing.
- SOUSHINE FSRs fit in small spaces.
- They do not use much power.
- They work in many ways.
You will find tips for fixing problems and avoiding mistakes. Both sensor types help you make projects that respond to touch or pressure.
Table of Contents
Key Takeaways
Anyone can make projects with piezoelectric sensors by following easy steps. Piezoelectric sensors make electricity when you press or bend them. This makes them good for finding taps and shakes. SOUSHINE FSRs are another good choice for measuring steady pressure. They are simple to use in small places. Testing and fixing problems are very important to make sure your sensor works right. Always check your wires and resistor numbers. If you use a microcontroller like Arduino, you can read sensor data. You can also make fun projects that react to what you do. Signal conditioning can help make your sensor readings better. Try different resistor numbers to change how sensitive your sensor is. If you plan and set up your workspace, your project will go smoother and you will make fewer mistakes.
Piezoelectric Sensor Basics
How It Works
A piezoelectric sensor has a special material inside. This material makes electricity when you press or bend it. This is called the piezoelectric effect. If you tap or squeeze the sensor, it sends out a small electric signal. Electronics can read this signal to know how much pressure or force is used. The sensor can also do the opposite. If you put voltage on it, the material will change shape. This helps make sound or find vibrations.
Tip: Some piezoelectric sensors notice quick changes in force. They react very fast. This makes them good for projects that need to sense taps or shakes.
Common Uses
People use a piezoelectric sensor in many simple projects. Here are some common ways they are used:
- Microphones: They turn sound into electric signals.
- Pickups for musical instruments: Guitars use them to get sound.
- Electronic drum pads: They sense when you hit them.
- Ultrasonic transducers: These help with sonar and wave finding.
Different piezoelectric sensors can also check pressure, speed, temperature, strain, and force. Makers like them for projects that need to sense quick moves or shocks.
Benefits
Piezoelectric sensors have many good points for DIY projects:
- They are tiny and fit in small places.
- They react fast to pressure, even in less than a millionth of a second.
- They give correct readings for fast things.
- Their simple design makes them easy to use and strong.
- They have a high signal-to-noise ratio, so signals are clear.
Here is a table that shows how a piezoelectric sensor and a SOUSHINE FSR are different:
| Feature | Piezoelectric Sensors | SOUSHINE FSRs |
|---|---|---|
| Working Principle | Make electric signal from pressure or bending | Change resistance when pressed |
| Sensitivity | Very sensitive to small, quick changes | Somewhat sensitive, better for steady forces |
| Response | React very fast to changes in force | Steady signal with ongoing pressure |
| Applications | Best for measuring vibrations and shocks | Good for finding touch and grip strength |
A piezoelectric sensor is best for quick taps or shakes. SOUSHINE FSRs are better for steady pressure or grip. Both sensors help makers build fun projects, but each one is good at different things.
Materials and Tools
You need the right things to build a piezoelectric sensor project. Each part helps the sensor work and connect to other pieces. Below is a list for a simple setup. You can also use SOUSHINE FSRs instead.
Required Components
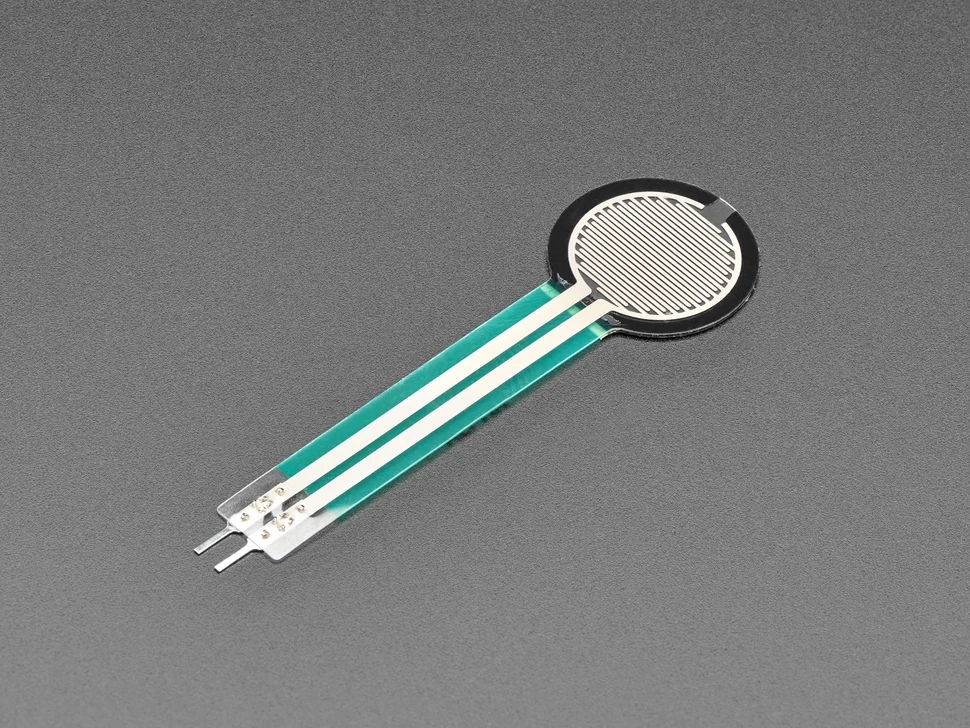
Piezoelectric Sensor
A piezoelectric sensor makes electricity when you press or bend it. These sensors are often small discs or strips. They work best with other parts that help send the signal.
Microcontroller (e.g., Arduino)
A microcontroller reads signals from the piezoelectric sensor. Arduino boards are easy to use and work for many projects. The microcontroller connects to the sensor and helps use the data.
Wires, Breadboard, Resistors
Wires link the sensor to the microcontroller. A breadboard lets you test circuits without soldering. Resistors control how much electricity flows. Other helpful things are capacitors, diodes, and foam push-ups. Some projects use a PVC sheet or glue to hold parts together. These items keep the setup safe and steady.
SOUSHINE FSR (Alternative)
SOUSHINE FSRs use special materials to sense force and pressure. They are good for projects that need to measure steady pressure. These sensors fit in small spaces and use little power. You can use them instead of a piezoelectric sensor if you need a different way to sense force.
Tools List
Multimeter
A multimeter checks if the sensor and wires work right. It measures voltage, resistance, and current. This tool helps you find problems in the circuit.
Soldering Iron (Optional)
Some projects need a soldering iron to join wires and sensors. Soldering makes the connections strong and last longer. For quick tests, a breadboard works without soldering.
Computer with Arduino IDE
A computer runs the Arduino IDE program. This lets you write and send code to the microcontroller. The computer also helps you watch signals from the sensor.
Tip: Keep all your materials neat before you start. This makes building and testing much easier.
Where to Buy
It is important to get good piezoelectric materials and sensors. Trusted stores have many products for different needs. The table below shows good places to buy piezoelectric sensors and SOUSHINE FSRs.
| Retailer | Product Type | Description |
|---|---|---|
| Piezo.com | Piezoelectric Sensors | Sells many piezoelectric sensors that are sensitive and reliable for different uses. |
| FSREXPERT.com | SOUSHINE FSRs | Sells Force Sensing Resistors with new technology for force and pressure detection. |
Many online stores also sell wires, breadboards, resistors, and other materials. Local electronics shops may have some things, but online stores have more choices.
Piezoelectric materials like discs, wires, and capacitors are easy to find. Makers should check that all parts fit the project before buying. Good materials help the sensor work well and last longer.
Workspace Setup
Sensor Inspection
Check the piezoelectric sensor before you start. This helps you find problems early. Use this easy checklist to inspect the sensor:
- Line up the sensor with the contact surfaces. This stops bending or loading on the edges.
- Make sure both surfaces are parallel. This keeps the sensor from bending.
- Check that the mounting surfaces are flat. Flat surfaces help you get good readings.
- Put a thin layer of lubricant on the mounting surfaces. This helps the sensor touch better.
- If the contact surface is flat but not parallel, use a curved piece in between. This helps stop edge loading.
- Add a damping layer to the interface surface. This helps stop strong shocks.
Careful checking helps the sensor work well and last longer.
Safety Tips
Be safe when you use piezoelectric sensors and microcontrollers. The table below lists important safety tips:
| Safety Precaution | Description |
|---|---|
| Fragility | Hold piezo sensors by the edges. Do not press hard or bend them. |
| Toxicity | Broken piezo pieces may have lead oxide. Be careful with broken parts. |
| Contamination | Do not touch the sensor surface. Fingerprints make soldering or gluing harder. |
Always keep your workspace clean. If a sensor breaks, pick up the pieces carefully. Wash your hands after you touch broken parts.
Tip: Do not eat or drink near your workspace. This helps keep things clean.
Preparation Steps
Getting ready makes your project easier. Follow these steps to prepare:
- Learn how the piezoelectric effect works in projects.
- Gather all your materials like sensors, wires, breadboards, and microcontrollers.
- Set up a space to test sensor outputs. Make sure it has good light and enough room for tools.
- Build a diode rectifier bridge on a breadboard if you need to change AC voltage to DC. Make sure the diodes point the right way.
- Connect the piezo element to the circuit. This lets you power LEDs or charge capacitors.
- Look at the circuit diagram before you start. This helps you avoid mistakes.
- Organize your materials and tools so you can reach them easily.
A good workspace helps your project go well. Makers who plan ahead finish faster and have fewer problems.
Wiring the Piezoelectric Sensor
Wiring a piezoelectric sensor might seem hard at first. It gets easier if you follow a plan. This part shows how to connect the sensor and set it up. You will also learn ways to make the signal better.
Pinout Guide
Most piezoelectric sensors for DIY have simple pins. Each pin does something important. The table below shows what each pin is for:
| Pin Number | Description |
|---|---|
| 1 | Signal Output (+) |
| 2 | Ground (-) |
Some modules have three pins instead of two. Here is what each pin does:
| Pin Name | Description |
|---|---|
| Signal | Sends out a voltage that changes with vibration |
| VCC | This pin gives power (3.3V to 5V) |
| GND | Connects to ground |
Tip: Always look at the sensor’s datasheet before you wire it. Some sensors use different names for their pins.
Breadboard Setup
Putting the sensor on a breadboard helps you test it first. Follow these steps to set it up:
- Connect the VCC pin to the power on the breadboard.
- Attach the GND pin to the ground rail.
- Plug the Signal pin into an analog input on the microcontroller.
- If there is a potentiometer, turn it to change the vibration level for the digital output.
This setup lets the microcontroller read both types of signals. The breadboard makes it easy to move wires and try new connections.
Note: Keep your wires short and tidy. Long wires can pick up noise and make the signal weak.
Signal Conditioning
Piezoelectric sensors can get unwanted noise in their signals. Signal conditioning helps make the signal clean and strong. Here are some ways to do this:
- Use special cables that block radio and electromagnetic noise.
- Add amplifiers to change high-impedance signals to low-impedance ones.
- Try ICP® sensors for better signal quality and steady voltage.
- Make sure the circuit has high insulation resistance. This keeps the signal steady.
- Keep cables short. Short cables help stop electrical noise and keep the signal strong.
Tip: Good signal conditioning helps the sensor work better in every project.
With the right wiring, breadboard setup, and signal conditioning, anyone can use a piezoelectric sensor well in their DIY projects.
Microcontroller Connection
Arduino Wiring
It is not hard to connect a piezoelectric sensor to an Arduino. You just need to follow some steps to make it work well. The sensor makes a small voltage when you press or tap it. The Arduino can read this voltage and turn it into data.
Here is a simple way to connect a piezo sensor to an Arduino:
- Put the piezo sensor on the breadboard.
- Connect one lead of the sensor to an analog pin like A0 on the Arduino.
- Attach the other lead to the GND pin on the Arduino.
- Place a 1 Megohm resistor next to the piezo sensor. This resistor helps the signal stay steady and sets how sensitive the sensor is.
- Use a 10K resistor between the sensor and the Arduino input pin. This resistor keeps the current low and protects the Arduino.
- Some people use two 100K resistors as a voltage divider. This helps keep the signal stable and limits the current.
Tip: Try different resistor values between 470K and 1 Megohm. This helps you get the best signal for your project.
A simple wiring diagram looks like this:
Piezo Lead 1 ----[10K]---- Arduino A0
      |                        |
   [1MΩ]                   Arduino GND
      |                        |
Piezo Lead 2 --------------- Arduino GND
This setup lets the Arduino see changes in voltage when you tap or press the sensor.
Connection Check
After you finish wiring, you should check if the sensor works right. Piezoelectric sensors make voltage when they bend or move. They have high output impedance, so the signal can get weak or noisy if not handled well.
Here are some ways to check your connection:
- Use a multimeter to see the voltage across the sensor when you tap it. The voltage should change each time you tap.
- Watch the Arduino serial monitor for changes in the analog value when you press the sensor.
- If the signal is weak or jumps around, try signal conditioning. Many people use a charge amplifier or a simple op-amp circuit. This changes the sensor’s high-impedance output to a low-impedance signal. It helps the Arduino read the signal better.
- Sometimes you can connect the sensor straight to the Arduino’s analog input. But extra circuits help you get better and more steady readings.
Note: If the sensor does not work, check all wires and resistor values. Make sure the sensor leads go to the right pins.
With these steps, anyone can connect a piezoelectric sensor to an Arduino and check if it works. Good wiring and careful checking help your project start well.
Sample Code
Reading Sensor Data
Many beginners want to see how a piezoelectric sensor works with Arduino. The process starts with reading sensor data. Using pictoblox, users can set up a simple script to read analog values from the sensor. The table below shows each step:
| Step | Description |
|---|---|
| 1 | Open pictoblox and create a new file. |
| 2 | Go to boards and select Arduino Uno. |
| 3 | Add ‘When Flag Clicked’ from the event palette into the scripting area. |
| 4 | Add ‘Forever’ block from the controls palette. |
| 5 | From the looks palette, drag ‘say()’ block into the scripting area and place it inside the forever block. |
| 6 | From the Sensor palette of Arduino, drag ‘Read analog sensor () at ()’ and place it inside the say block. Choose generic from the drop-down. |
| 7 | Your final script will look like this. |
This script lets the Arduino read the sensor value over and over. The value changes when someone taps or presses the sensor.
Tip: Try tapping the sensor gently and watch the numbers change in real time.
Uploading Code
Uploading code to the Arduino is a key step. The process is simple and works for most piezoelectric sensor projects. Here is a clear list of steps:
- Connect the piezoelectric sensor and Arduino as shown in the wiring section.
- Upload the code to the Arduino. For example:
int buzzerPin = 8; int buttonPin = 7; void setup() { pinMode(buzzerPin, OUTPUT); pinMode(buttonPin, INPUT_PULLUP); } void loop() { int buttonState = digitalRead(buttonPin); if (buttonState == LOW) { digitalWrite(buzzerPin, HIGH); } if (buttonState == HIGH) { digitalWrite(buzzerPin, LOW); } } - In the setup, set the buzzer pin as OUTPUT and the button pin as INPUT with pullup.
- In the loop, read the button state and control the buzzer.
This code helps users test if the sensor and circuit work. When the sensor detects a press, the buzzer turns on.
Serial Monitor
The Arduino Serial Monitor helps users see sensor data. It shows numbers or simple graphs. Some functions make the data easy to read. The table below explains these functions:
| Function Name | Description |
|---|---|
serialOutput() | Decides how to show serial data based on a flag. |
arduinoSerialMonitorVisual() | Shows sensor data in the Serial Monitor using ASCII art for different ranges. |
map(sensorReading, sensorMin, sensorMax, 0, 11) | Maps the sensor reading to a range for visualization. |
Users can open the Serial Monitor in the Arduino IDE. When they tap the sensor, they see the numbers jump. ASCII art can show bars or lines for each tap.
Note: If the numbers do not change, check the wiring and code. The Serial Monitor is a great tool for finding problems fast.
Testing and Troubleshooting
Sensor Test
Testing a piezoelectric sensor helps makers see if the setup works. They can start by tapping the sensor with a finger or a pencil. The Arduino Serial Monitor should show numbers that jump when the sensor feels a tap. If the numbers do not change, the sensor might not connect right.
Steps for a quick sensor test:
- Open the Arduino Serial Monitor.
- Tap the sensor gently.
- Watch for changes in the numbers.
- Try pressing harder or softer to see different values.
Tip: If the sensor sits on a table, it may not pick up small taps. Hold the sensor in the air or attach it to a surface for better results.
Common Issues
Sometimes, the sensor does not work as expected. Makers often see a few common problems. The table below lists these issues and ways to fix them.
| Issue | What to Check or Do |
|---|---|
| No signal | Check wires and resistor values. |
| Weak signal | Try a different resistor. |
| Noisy readings | Use shorter wires or add a capacitor. |
| Always high or low | Make sure the sensor connects to the right pins. |
| Random spikes | Move the sensor away from other electronics. |
If the sensor still does not work, try a new breadboard or sensor. Sometimes, a part does not work right from the start.
Note: Static electricity can hurt sensors. Touch a metal object before handling the sensor.
Sensitivity Adjustment
Makers can change how much the sensor reacts to taps or pressure. They do this by changing the resistor value in the circuit. A bigger resistor makes the sensor more sensitive. A smaller resistor makes it less sensitive.
How to adjust sensitivity:
- Use a 1 Megohm resistor for high sensitivity.
- Try a 470K resistor for lower sensitivity.
- Test different values to find what works best.
Some projects need the sensor to pick up light taps. Others need it to ignore small bumps. Makers can also add a small capacitor across the sensor leads. This helps smooth out the signal and cut down on noise.
Tip: Write down the resistor and capacitor values that work best. This helps when building more projects later.
With these steps, anyone can test, fix, and adjust a piezoelectric sensor for their DIY project. Makers who check their work and try small changes often get the best results.
Project Integration
Tap Sensor
A piezoelectric sensor can be used as a tap sensor. Many people use it to find quick taps or knocks. This project lets a device react when you tap a surface. The steps below show how to make a tap sensor with an Arduino.
- Arduino board
- Piezoelectric sensor (tap sensor module)
- Breadboard
- Jumper wires
- USB cable
- Computer with Arduino IDE
How to Build a Tap Sensor:
- Wiring
Connect the tap sensor module to the Arduino. Attach the VCC pin to 5V. Connect GND to ground. Connect DOUT (signal) to a digital input pin on the Arduino. - Arduino Code
Write a simple program in the Arduino IDE. The code should read the sensor’s output. It prints a message when it finds a tap.int tapPin = 2; int tapState = 0; void setup() { pinMode(tapPin, INPUT); Serial.begin(9600); } void loop() { tapState = digitalRead(tapPin); if (tapState == HIGH) { Serial.println("Tap detected!"); } delay(100); } - Uploading the Code
Use a USB cable to upload the code to the Arduino. - Observing the Output
Open the Serial Monitor in the Arduino IDE. When you tap the sensor, the message “Tap detected!” will show up. - Experiment and Interact
Try tapping the sensor with different force. Change the code to make an LED blink or a buzzer sound when you tap.
Tip: If the sensor does not find taps, check the wires. Make sure the sensor sits flat on the surface.
A tap sensor project helps beginners learn how sensors turn touch into signals. Makers can use this for musical instruments, counters, or alarms.
Vibration Detector
Piezoelectric sensors can also find vibrations. They sense shaking, knocks, or movement. This makes them good for projects that need to know when something moves.
Steps to Make a Vibration Detector:
- Build the circuit with the piezoelectric sensor and connect it to the Arduino.
- Upload code that reads the sensor’s voltage and prints it to the Serial Monitor.
- Open the Serial Monitor and set the baud rate to 9600. Watch the numbers change when the sensor feels a shake.
- Shake or tap the sensor. The voltage spikes show up as higher numbers.
- Use the Serial Plotter in the Arduino IDE to see the voltage spikes as a graph.
- Set a threshold in the code. When the sensor reading goes above this number, the Arduino can turn on an LED or sound a buzzer.
Sample Code for Vibration Detection:
int vibPin = A0;
int sensorValue = 0;
int threshold = 100;

void setup() {
  Serial.begin(9600);
  pinMode(13, OUTPUT); // LED on pin 13
}

void loop() {
  sensorValue = analogRead(vibPin);
  Serial.println(sensorValue);
  if (sensorValue > threshold) {
    digitalWrite(13, HIGH); // LED on
  } else {
    digitalWrite(13, LOW); // LED off
  }
  delay(50);
}
Note: Piezoelectric sensors make an AC voltage when they feel movement. This helps them spot vibrations. The voltage spikes help the Arduino know when something shakes.
A vibration detector can protect things, count steps, or set off alarms. Makers can change the threshold to ignore small bumps and only react to strong shakes.
Project Ideas Table
| Project Type | What It Does | Example Use Case |
|---|---|---|
| Tap Sensor | Finds quick touches | Digital drum pad |
| Vibration Detector | Senses movement or shaking | Anti-theft alarm |
Both projects show how piezoelectric sensors turn simple actions into signals. Makers can build many cool devices by changing the code or adding more parts.
Piezoelectric Generator Project
Piezoelectric generator projects help people turn movement into electricity. Many people use energy harvesting to get small amounts of power from daily movements. A piezoelectric sensor can make energy in easy ways. These projects show how to use piezoelectric sensors to power small things.
Footstep Power Generation
People want to make power from walking. Footstep power generation uses a piezoelectric generator to collect energy from each step. When someone steps on a piezoelectric sensor, the pressure bends it. This makes an electric charge. The charge goes through a circuit and becomes usable power.
- The piezoelectric effect lets the sensor make electricity when pressed.
- Each step bends the sensor and sends out a signal.
- Circuits turn this signal into DC power for storage or use.
To build a footstep power project, many use plywood as a base. They put piezo buzzers under the plywood. When someone walks, the buzzers bend and make power. Makers can connect many piezoelectric generators together to get more energy from piezoelectric sensors. This works well in busy places like hallways or doorways.
Tip: Try using foam or rubber between the plywood and the sensors. This spreads the force and keeps the piezoelectric generator safe.
Simple LED Generator
A simple LED generator project shows how energy harvesting works. Makers use a piezoelectric generator to light up an LED. The circuit collects energy from piezoelectric sensors and stores it for a short time.
Here is a table of parts for a basic LED generator:
| Component | Purpose |
|---|---|
| Piezoelectric Sensor | Changes movement into electric charge |
| LED (Blue) | Shows when power is made |
| Diode (1N4007) | Changes AC to DC |
| Capacitor (47uF) | Holds the voltage made |
| Resistor (1k) | Keeps the current safe |
| Push-button | Lets you use the stored energy to light the LED |
| Connecting Wires | Joins all the parts |
| Breadboard | Lets you build the circuit easily |
To build this project, connect the piezoelectric generator to the diode and capacitor. The diode changes the AC signal to DC. The capacitor stores the charge. When someone presses the push-button, the stored energy lights up the LED. This project helps people see how energy from piezoelectric sensors can power small things.
Many students and hobbyists start with these projects. They learn how energy harvesting works and see real results. Piezoelectric generator projects can get bigger by adding more sensors or using the power for other things.
Note: Piezoelectric generator projects do not make much power, but they show how to use energy from piezoelectric sensors in fun ways.
Tips and Next Steps
Beginner Advice
Piezoelectric sensors might seem hard at first, but anyone can learn by trying one thing at a time. Many people start with easy projects, like making a tap sensor or a vibration detector. They watch how the sensor reacts when they touch or move it. After that, they can try new things, like turning on an LED or making a simple alarm. Keeping notes helps remember what works and what does not. If something fails, check each wire and part to find the problem. Mistakes are okay. Every project teaches something new.
Tip: Do one project before starting another. This helps you get better and feel more confident step by step.
Mistakes to Avoid
Beginners often make the same mistakes with piezoelectric sensors. Sometimes, they use wires that are too long, which can make the signal noisy. They might forget to use the right resistor, so the sensor is too sensitive or not sensitive enough. Pressing too hard can break the sensor. Some people forget to check the circuit before turning it on. Every project needs careful setup and checking.
Here are some mistakes to look out for:
- Using wires that are too long
- Not adding a resistor or using the wrong one
- Pressing too hard on the sensor
- Not checking connections before starting
- Forgetting safety tips
Note: Check every step before you start. This saves time and keeps your sensor safe.
More Project Ideas
After finishing easy projects, many people want to try new and fun ideas. Piezoelectric sensors can be used in lots of cool projects. Some advanced ideas use sensors to make power or send alerts. The table below shows some creative projects with piezoelectric sensors:
| Project Title | Description |
|---|---|
| Smart Power Shoe | A mobile charger that uses solar and piezoelectric transducers to make power while walking. |
| Electricity Generating Speed Breaker | A system that turns energy from cars into electricity at speed bumps. |
| Power Generation from Footpaths | Changes energy from footsteps into power for street lights. |
| Collision Detector | Uses sensors to find crashes and send emergency SMS alerts to hospitals. |
People can also make musical instruments, smart mats, or simple games. Every new project helps you learn more about sensors and electronics. You can share your results with friends or online groups. This helps others learn and gives you new ideas for your next project.
Tip: Keep trying new projects. Each one is a chance to learn something new.
Anyone can make a DIY project with a piezoelectric sensor. Start by getting all the parts you need and setting up your work area. Then, connect the sensor and hook it up to a microcontroller. Testing and fixing problems will help your project work better. Makers sometimes use both piezoelectric sensors and SOUSHINE FSRs to see which one fits their project best. The table below shows what you should think about:
| Key Consideration | Description |
|---|---|
| Environment | Sensors need to work in heat, wet places, and when things shake. Where you put them and how you protect them is important. |
| Budget | SOUSHINE FSRs are a good choice if you want something that works well and does not cost too much. |
| Product Support | Brands like SOUSHINE give good help for setting up and fixing problems. |
When you share your projects, you get new ideas and tips from others. If you make a mistake, you learn from it and your next project gets even better.
FAQ
What does a piezoelectric sensor do in a DIY project?
A piezoelectric sensor turns pressure or movement into electricity. Makers use it to find taps, knocks, or shakes in easy projects.
Can someone use a SOUSHINE FSR instead of a piezoelectric sensor?
Yes. SOUSHINE FSRs are good for steady pressure or grip. They fit in tight spots and do not use much power. Many projects use them instead of piezoelectric sensors.
How does a piezoelectric sensor connect to an Arduino?
Connect one wire to an analog pin and the other to ground. Add a resistor to set how sensitive it is. The Arduino checks voltage changes when you press the sensor.
Why does the sensor sometimes give noisy readings?
Long wires or other electronics can make noise. Use short wires and add a resistor or capacitor to help. Keep the sensor away from strong electric things.
Can a piezoelectric sensor power an LED directly?
No. The sensor makes only a little electricity. Use a circuit with a diode and capacitor to save energy. Then you can light an LED for a short time.
Where can someone buy piezoelectric sensors and SOUSHINE FSRs?
Many online stores sell these sensors. Piezo.com has piezoelectric sensors. FSREXPERT.com sells SOUSHINE FSRs. Some local shops may have them too.
What is the best way to test if a sensor works?
Tap the sensor and look at the Arduino Serial Monitor. If the numbers move, the sensor works. If not, check the wires and resistor.
Are piezoelectric sensors safe for beginners?
Yes. They are safe if you are careful. Do not bend or press too hard. Always check for broken pieces and wash your hands after touching them.