Call us: +86-137-2353-4866
You want the best force sensor for your Arduino project. SOUSHINE Force Sensing Resistor is special because it works the same every time, lasts a long time, and is easy to set up. You need a force-sensitive resistor that is very accurate, gives the same results each time, and works well with force sensor arduino systems. A good force-sensing part helps you get steady and exact control in every project.
Table of Contents
Key Takeaways
- Pick the SOUSHINE Force Sensing Resistor for steady and correct force readings in your Arduino projects.
- Learn about what makes each sensor special, like FlexiForce A201 for very good accuracy and Interlink FSR 402 for easy touch sensing.
- Always set up your force sensor with weights you know to make sure your results are right and can be done again.
- Think about how long the sensor will last, especially if your project will run for a long time.
- Use the comparison table to find the best force sensor for your project by looking at how steady, correct, and cheap it is.
Top Force Sensor Arduino Options
When you begin a force sensor arduino project, you can pick from many sensors. Each force sensor has its own good points. You should learn how each sensor works. This helps you know which one is best for your project.
SOUSHINE Force Sensing Resistor
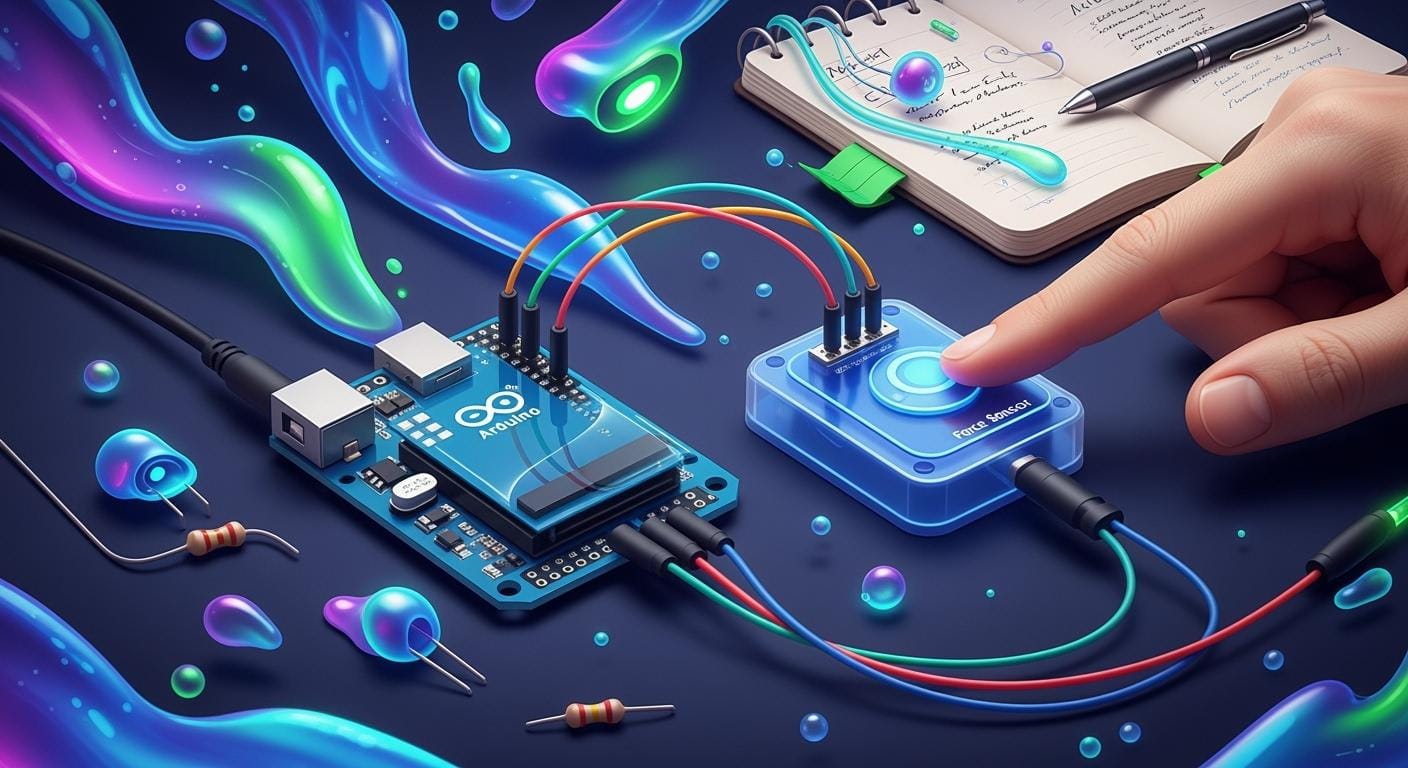
You can trust SOUSHINE Force Sensing Resistor for steady force readings. This force-sensitive resistor uses a piezoresistive design. It changes resistance smoothly, not just on or off. You get clear feedback every time you press it. SOUSHINE is special because it uses a bendable base and a unique conductive layer. The sensor stays open until you press it. The resistance drops when you push harder. You can pick from many shapes and sizes for your project. The sensor works well in tough places and lasts a long time. It uses very little power, so you save energy. You can connect it easily to your arduino board. SOUSHINE is made in a way that keeps costs low. This makes it a smart pick for many force sensor arduino projects.
Tip: SOUSHINE gives help and custom options. You can ask for a special shape or size if you need it.
Here is a table that shows what makes SOUSHINE Force Sensing Resistor unique:
| Feature | Description |
|---|---|
| Piezoresistive Device | Changes resistance smoothly for exact force measurement, not just on or off. |
| Flexible Substrate | Made from thin material with a circuit that stays open until pressed. |
| Spacer | Keeps the circuit and conductive layer apart until you press it. |
| Conductive Substrate | Has a special coating that changes when you press it. |
| Cost-Effective Manufacturing | Made cheaply so many people can use it. |
| Customizable Shapes/Sizes | Comes in many shapes and sizes for different needs. |
| Durability and Reliability | Works well for a long time, even in hard places. |
| Low Power Consumption | Good for devices that use batteries and need to save energy. |
| Ease of Integration | Easy to connect to other systems. |
FlexiForce A201
FlexiForce A201 is another force sensor for arduino projects. You use it when you want high accuracy and the same results each time. This force-sensitive resistor works in many places. It can handle lots of presses and responds quickly. You can measure force with good detail. The sensor works in hot and cold places and gives steady readings.
Here is a table with the main things FlexiForce A201 can do:
| Characteristic | Value |
|---|---|
| Operating Temperature | -40°C to 60°C (-40°F to 140°F) |
| Durability | Can be pressed over 3 million times (22 N / 5 lb) |
| Linearity (Error) | Less than ±3% of full scale |
| Repeatability | Less than ±2.5% |
| Hysteresis | Less than 4.5% of full scale |
| Drift | Less than 5% over time |
| Response Time | Less than 5 microseconds |
| Temperature Sensitivity | 0.36% per degree Celsius (± 0.2% per degree Fahrenheit) |
Interlink FSR 402
Interlink FSR 402 is a well-known force-sensitive resistor. You see it in many arduino starter kits. This sensor finds force and pressure by changing resistance. You can use it for simple touch or pressure sensing. It is easy to connect and works well for basic force sensor arduino projects. The sensor is thin and bends easily, so it fits in small spaces. You get good results for light and medium force sensing.
Load Cell with HX711
You use a load cell with HX711 to measure weight or strong force. The HX711 is a 24-bit converter. It gives you exact weight readings with load cells. You can measure forces from 500g to 5kg. The sensor finds tiny changes in weight, down to 0.0001g. In real projects, you get close to 0.1% accuracy. You need to set up wires and adjust it, but you get very good results for weight sensing.
Velostat and Other Alternatives
Velostat is a cheap material for DIY force sensor arduino projects. You use it in flex sensor gloves and pressure systems. Velostat changes resistance when you bend or press it. You can shape it for your own designs. It works for simple force sensing and movement detection. You see it in robot arms and easy pressure sensors. Velostat is sensitive to force, but it is not as exact or steady as force-sensitive resistors like SOUSHINE or Interlink.
- Velostat is used in DIY gloves and pressure sensors.
- It finds force or movement by changing resistance.
- You can use it for simple projects, but it is less exact than force-sensitive resistors.
- Velostat works in robot grippers and easy pressure systems.
- You can test it with weights from 100 gm to 2000 gm.
You have many choices for force sensor arduino projects. Each sensor gives you different good points. SOUSHINE Force Sensing Resistor is great for being reliable, tough, and easy to use. You can pick the best force sensor by looking at accuracy, repeatability, and how it fits your project.
Force Sensor Reliability Factors
Accuracy and Sensitivity
You want your force sensor to show the right force. Accuracy means the sensor tells you the real force you use. Sensitivity shows how well the sensor finds small pressure changes. Some sensors, like RP-S40-ST, can be off by about 20%. If you press with 1kg, it might show 200g too much or too little. This is fine for most arduino projects if you do not need perfect numbers. SOUSHINE checks and sets each sensor to give good and sensitive results.
Durability and Lifespan
You need a force sensor that works for a long time. Durability means the sensor keeps working after many presses or bends. Lifespan is how long the sensor stays strong and correct. SOUSHINE checks every sensor from start to finish. You get a sensor that works in hard places, like cars or medical tools. The sensor keeps its shape and works well, so you do not need to change it often.
Consistency and Repeatability
You want your force sensor to show the same number every time. Consistency means the sensor does not change its answer from one test to the next. Repeatability means you get steady numbers, even after many uses. Some tests show sensors can change if you do not press the same way. Sensors like FlexiForce A201 and Interlink FSR 402 give steady results and match force to output well. SOUSHINE designs and tests sensors to give repeatable results in arduino projects.
SOUSHINE checks quality and tests resistance to make sure every sensor is reliable.
Arduino Compatibility
You need a force sensor that connects easily to your arduino board. Compatibility means you can wire the sensor with no trouble and get clear numbers in your code. SOUSHINE makes sensors easy to use with many arduino boards. You get quick results. The sensors work with simple circuits and do not need special parts. This helps beginners and experts use force sensors easily.
- You get good force sensing for arduino projects when you pick a sensor with strong accuracy, durability, repeatability, and compatibility.
- SOUSHINE’s testing and quality checks help you trust your force sensor every time you use it.
Pros and Cons of Each Force Sensor
SOUSHINE Force Sensing Resistor
SOUSHINE Force Sensing Resistor gives you steady results. The sensor works every time you press it. You can measure force with good detail. The calibration curve matches the force you use. You connect it to arduino with a simple voltage divider. The sensor lasts long and fits many projects.
| Aspect | Description |
|---|---|
| Reliability | Responds the same way to pressure each time. |
| Accuracy | Measures force with a clear calibration curve. |
| Ease of Integration | Connects easily to arduino with basic circuits. |
SOUSHINE is a good choice for projects needing steady and exact force readings.
FlexiForce A201
FlexiForce A201 gives you very good accuracy and repeatability. You use it for projects that need detailed force measurement. The sensor works in hot and cold places. It can handle lots of presses. You may need to calibrate it for best results.
Pros:
- Very accurate for force measurement.
- Handles many presses without breaking.
- Works in hot and cold places.
- Responds quickly to force.
Cons:
- Needs careful calibration for best results.
- Costs more than basic sensors.
Interlink FSR 402
Interlink FSR 402 is found in many arduino kits. You use it for simple touch and pressure sensing. The sensor is thin and fits in small spaces. It responds fast when you press it. Readings can change if you press in different ways.
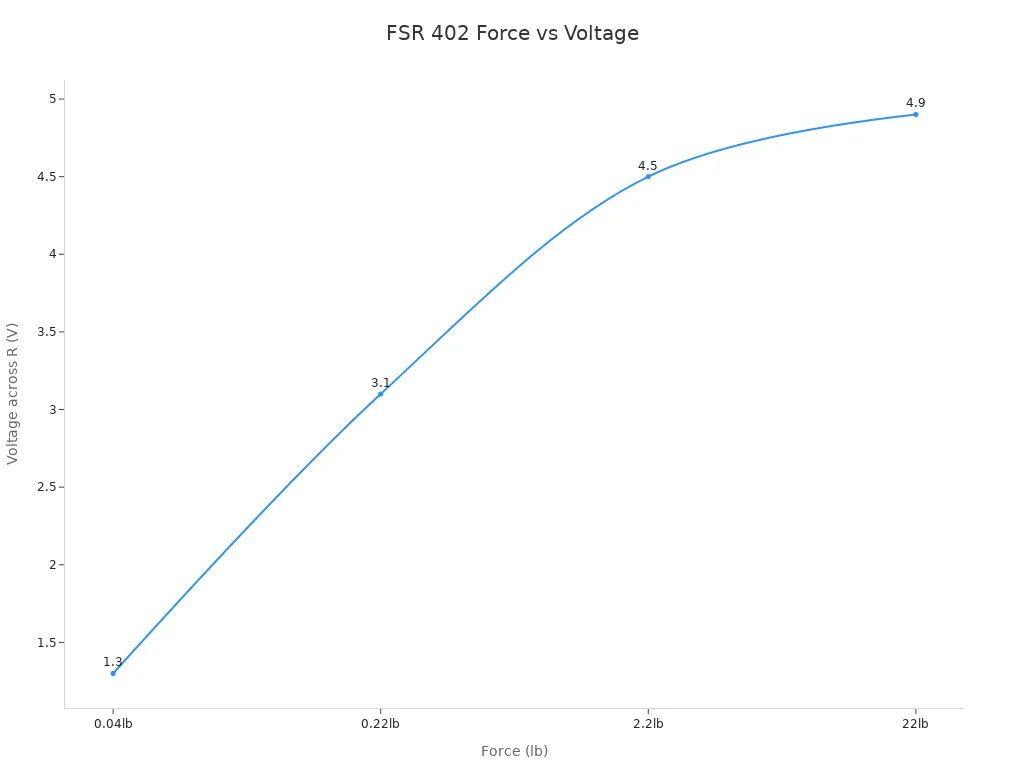
| Force (lb) | Force (N) | FSR Resistance | Voltage across R |
|---|---|---|---|
| None | None | Infinite | 0V |
| 0.04 | 0.2 | 30KΩ | 1.3V |
| 0.22 | 1 | 6KΩ | 3.1V |
| 2.2 | 10 | 1KΩ | 4.5V |
| 22 | 100 | 250Ω | 4.9V |
Pros:
- Easy to use with arduino boards.
- Thin and bends easily.
- Good for light and medium force sensing.
Cons:
- Readings change if you press differently.
- Not as accurate for heavy force.
Load Cell with HX711
You use a load cell with HX711 to measure weight and strong force. The HX711 amplifier makes small signals bigger. You get very accurate readings in your arduino project. The sensor fits in tight spaces. It measures both pulling and pushing force.
Pros:
- Very accurate for weight and force.
- Small size fits tight spaces.
- Measures tension and compression.
- Good for sensitive projects.
Cons:
- Needs careful wiring and setup.
- Costs more than simple force sensors.
Velostat
Velostat is a flexible and cheap force sensor. You use it in DIY arduino projects like gloves and robot arms. The material bends and changes resistance when pressed. Accuracy can change if the temperature changes or if you use it outside.
| Benefits | Limitations |
|---|---|
| Cheap for dynamic input devices | Sensitive to temperature changes |
| Flexible and light | Accuracy can change over time |
| Works better with use | Needs protection for outdoor use |
Velostat is good for simple force sensor arduino projects, but you need extra care for steady results.
Force Sensor Arduino Comparison Table
You want to pick the best force sensor for your arduino project. A table helps you see how each force sensor is different. You can check reliability, accuracy, durability, how easy it is to use, and price. This makes it simple to choose the right force sensor for your needs.
Here is a table that shows the top force sensor choices for arduino:
| Force Sensor Model | Reliability | Accuracy | Durability | Ease of Integration | Price Range |
|---|---|---|---|---|---|
| SOUSHINE FSR | High | Good | 10 million actuations | Easy | $8 – $15 |
| FlexiForce A201 | High | High | >1 million actuations | Easy | $12 – $20 |
| Interlink FSR 402 | Good | Moderate | 10 million actuations | Very Easy | $10 – $18 |
| Load Cell with HX711 | High | Very High | >1 million actuations | Moderate | $15 – $30 |
| Velostat | Moderate | Low | Not rated | Easy | $3 – $8 |
Tip: Use this table to match your project with the right sensor. SOUSHINE FSR is great if you want high reliability and easy setup. FlexiForce A201 is best for very accurate measurements. Interlink FSR 402 is good for simple touch sensing. Load Cell with HX711 is best for measuring weight and strong force. Velostat is a good pick for cheap DIY projects.
SOUSHINE FSR gives you high reliability and lasts a long time. You can use it in many arduino projects that need steady force readings. FlexiForce A201 and Load Cell with HX711 are very accurate, but they need more setup. Interlink FSR 402 is simple to use and fits in small spaces. Velostat is flexible and cheap, but it is not as accurate as other sensors.
When you look at these force sensor choices, you can see what works best for your arduino project. You can choose based on your budget, how accurate you want your sensor to be, and how easy you want the setup. This table helps you make a smart choice for your next arduino force sensor project.
Choosing the Best Force Sensor
Define Project Needs
First, think about what your project needs. Decide how much force you want to measure. Figure out how exact your readings should be. Think about where you will use the sensor. Will the sensor need to last through lots of presses? Will it work in hard places? Use the table below to help you plan:
| Factor | Description |
|---|---|
| Calibration | Test with weights and use software filters for better accuracy. |
| Circuit Design | Add protective covers and pick the right resistors for steady performance. |
| Handling Non-Linearity | Use mapping or lookup tables for more precise measurements. |
| Debugging Issues | Check wiring often and recalibrate to keep readings correct. |
Match Sensor Specs
Check the details for each sensor. Look at the force range and size. See how the sensor connects to your arduino board. Make sure the sensor fits in your project space. Make sure it works with your circuit. Check if the sensor responds fast. See if it gives the same results each time. Picking the right specs helps your arduino project work well.
Budget and Availability
Know how much money you can spend. Find out which sensors you can buy near you. Prices change by brand and model. Use the table below to compare popular choices:
| Sensor Model | Price Range |
|---|---|
| SOUSHINE FSR | $8 – $15 |
| Interlink 408 | $10 – $18 |
| Ezweiji FSR | $6 – $12 |
| SF15-150 | $12 – $20 |
| Honeywell Force Sensor | $18 – $30 |
When to Choose SOUSHINE
Pick SOUSHINE Force Sensing Resistor if you want a sensor that is reliable. It is easy to use with arduino. SOUSHINE works best in these cases:
- Human touch input for interactive electronics
- Pressure-sensitive controls and buttons
- Weight sensing
- Medical devices such as blood pressure monitors
- Musical instruments like electronic drums
- Robotics for grip and touch sensing
SOUSHINE gives steady readings and lasts a long time. It is simple to set up. You can trust it for many force sensor arduino projects.
Arduino Force Sensor Integration Tips
Wiring and Circuit Setup
First, collect all the parts you need. Put the breadboard in front of you. Build the voltage divider circuit in the middle. Connect the force sensor to arduino with jumper wires. Use a 10kΩ resistor from the analog pin to ground. Solder the wires so they stay in place. Always check your wiring before turning on arduino. This helps you avoid mistakes.
| Component | Connection Point |
|---|---|
| FSR Terminal 1 | 5V on Arduino |
| FSR Terminal 2 | Analog Pin (A0) |
| 10kΩ Resistor | Between A0 and GND |
Tip: SOUSHINE sensors are simple to wire. You can ask for help if you need a special setup.
Arduino Code Basics
Write easy code to read the force sensor. Use analogRead to get numbers from the sensor. Save the reading in a variable. Print the value to the serial monitor. This shows how the sensor reacts when you press it. Here is a basic code example:
int sensorPin = A0;
int sensorValue = 0;

void setup() {
  Serial.begin(9600);
}

void loop() {
  sensorValue = analogRead(sensorPin);
  Serial.println(sensorValue);
  delay(100);
}
Note: SOUSHINE sensors work well with normal arduino code. You get good readings with simple commands.
Calibration and Testing
Calibrate your force sensor to get correct results. First, record the sensor value with no force. This sets your starting point. Use weights you know to make a calibration curve. Always test the same way to stop errors. Things like temperature and humidity can change your readings. Calibrate every two years or more if you use the sensor a lot.
| Best Practice | Description |
|---|---|
| Environmental factors | Test in steady conditions for best results. |
| Consistent methods | Use the same steps every time you measure. |
| Instrument drift | Calibrate often to keep readings right. |
| Documentation | Write down your calibration steps and results. |
Tip: SOUSHINE can help with calibration. You can ask their support for advice on testing and setup.
Troubleshooting
You might have problems during your arduino project. If the sensor does not work, check all the wires. Make sure the analog pin is working. If readings change too much, wires may be loose or there may be noise. Hold the sensor tight and add a capacitor to block noise. If the output is always high or low, check for damage and look at resistor values. Use the serial monitor to see feedback and fix your setup.
- Use serial monitoring to get quick feedback.
- Calibrate again if readings change over time.
- Cover the sensor to spread out the force.
- Try other resistor values for better sensitivity.
SOUSHINE gives help for troubleshooting. You can ask for help with wiring, coding, or calibration problems.
You need a force sensor that works well for arduino projects. SOUSHINE Force Sensing Resistor is good because it is sensitive, accurate, and reliable. Look at these main features:
| Feature | Description |
|---|---|
| Sensitivity | Finds tiny changes in force. |
| Precision | Measures small forces very well. |
| Reliability | Gives the same reading every time. |
Think about what you want your project to do before picking a sensor. If you want more information or a special sensor, try these ideas:
- Visit SOUSHINE’s website for easy guides.
- Use simple tools to test and set up your sensor.
- Ask SOUSHINE for expert advice.
Share your thoughts or questions in the comments. Your ideas help everyone make better projects!
FAQ
What is a force sensing resistor (FSR)?
You use a force sensing resistor to measure pressure or force. When you press the sensor, its resistance changes. Arduino reads this change and gives you a value you can use in your project.
How do you connect a SOUSHINE FSR to Arduino?
You connect one end of the SOUSHINE FSR to 5V and the other end to an analog pin. Place a resistor between the analog pin and ground. This setup forms a voltage divider.
Can you use SOUSHINE FSR for weight measurement?
You can use SOUSHINE FSR to measure weight. Place the object on the sensor. The sensor gives you a value that matches the force. For best results, calibrate the sensor with known weights.
How long does a SOUSHINE FSR last?
SOUSHINE FSR lasts for millions of presses. You can use it in projects that need long-term reliability. The sensor keeps working even after many cycles.
Do you need to calibrate a force sensor?
You should always calibrate your force sensor. Use known weights or forces. Calibration helps you get accurate and repeatable results in your Arduino project.