Call us: +86-137-2353-4866
Anyone can use a force sensitive resistor in a project. You connect it to a circuit to measure pressure or force. A force sensing resistor changes resistance when you press on it. This makes it good for finding touch or pressure. SOUSHINE is a leader in force sensing technology. They offer products that are reliable and easy to use. People find force sensing resistors in many devices today. For example:
- The global market for these sensors was $793 million in 2024. It should grow to $1,272 million by 2031.
- Asia-Pacific leads the industry because electronics are in high demand.
| Sector | Use Case Description |
|---|---|
| Consumer Electronics | Easy touch controls, pressure-sensitive gaming, and smart appliances. |
This guide will show each step in a simple way. Anyone can get started.
Table of Contents
Key Takeaways
A force sensitive resistor (FSR) changes how much it resists electricity when you press on it. This makes it good for measuring touch and force in many projects. – SOUSHINE sells FSRs that work well and can be changed for different uses. These sensors help people save power and money. – To use an FSR with an Arduino, connect the sensor to the voltage pin. Use a resistor to make a voltage divider. This helps you get correct readings. – Calibration is important for getting the right force measurements. Use weights you know to make a chart. The chart shows how resistance matches with force. – Force sensitive resistors are used in many things. They are in smart devices, robots, and medical tools. These sensors help make things safer and more responsive.
Force Sensing Resistor Basics
What Is a Force Sensitive Resistor
A force sensitive resistor is an easy electronic part. Its resistance changes when you press on it. People also call it a force sensing resistor or fsr. This part helps measure how much force you use. Many people use it to find touch or pressure in projects. For example, a force sensor lets a robot know when it touches something.
SOUSHINE makes these resistors for many things. Their fsr works in smart buttons, touch panels, and medical tools. The part is thin and can bend. People can put it in lots of places without problems.
How Force Sensitive Resistors Work
Many people ask, “how does fsr work?” The answer is easy. When you press the sensor, its resistance changes. If you press harder, the resistance gets lower. This change lets a circuit know how much force you use.
The science behind a force sensing resistor uses two main ideas:
- Percolation happens when the sensor has tiny particles. If you press hard, these particles touch more, and resistance can go up.
- Quantum tunneling happens at low pressure. Here, resistance drops as you press.
Tip: A force sensing resistor works fast. It can notice small changes in force right away.
Here is a quick look at how a force sensor and a pressure sensor are different:
| Criteria | Force Sensor | Pressure Sensor |
|---|---|---|
| Sensitivity | Finds small changes in force | Finds small changes in pressure |
| Response time | Reacts fast to force changes | Reacts fast to pressure changes |
A force sensing resistor gives feedback quickly. It helps you make projects that react to touch or pressure in real time.
Force Sensing Resistor Components
SOUSHINE FSR Overview
SOUSHINE sells force sensing resistors for many uses. These sensors work well in hard places and last long. People put them in cars, robots, and medical tools. SOUSHINE makes sensors in many shapes and sizes. This helps people fit sensors into different designs. Users can add logos or pictures to their sensors. The table below lists some ways to customize:
| Customization Type | Minimum Order |
|---|---|
| Customized logo | 2 pieces |
| Customized packaging | 2 pieces |
| Graphic customization | 2 pieces |
SOUSHINE sensors use little energy. This helps devices save power. The sensors give steady results for a long time.
Note: SOUSHINE sensors work for big and small projects. They help users save money and plan budgets.
Required Parts and Tools
To make a simple circuit with a force sensing resistor, you need some basic parts. The table below shows the main items and what is recommended:
| Component | Specification |
|---|---|
| Force Sensitive Resistor | Contact legs 2.54mm apart (0.1”) |
| Resistor | 4.7kΩ recommended for 1kg mass |
| Breadboard | Compatible with 2.54mm contact legs |
You also need a microcontroller like Arduino or Raspberry Pi. Wires are used to connect all the parts.
- Pick a lower resistance for higher force sensitivity.
- Use a higher resistance for better sensitivity at low forces.
The wiring diagram uses a voltage divider with the fsr and a 4.7kΩ resistor.
People choose these parts because they are easy to get. The breadboard lets you test circuits without soldering. Microcontrollers read sensor data and show results.
Some people want to save money on big projects. They try new materials or make sensors by hand. These ways can lower costs and still work well.
Wiring an FSR to Arduino
Circuit Setup
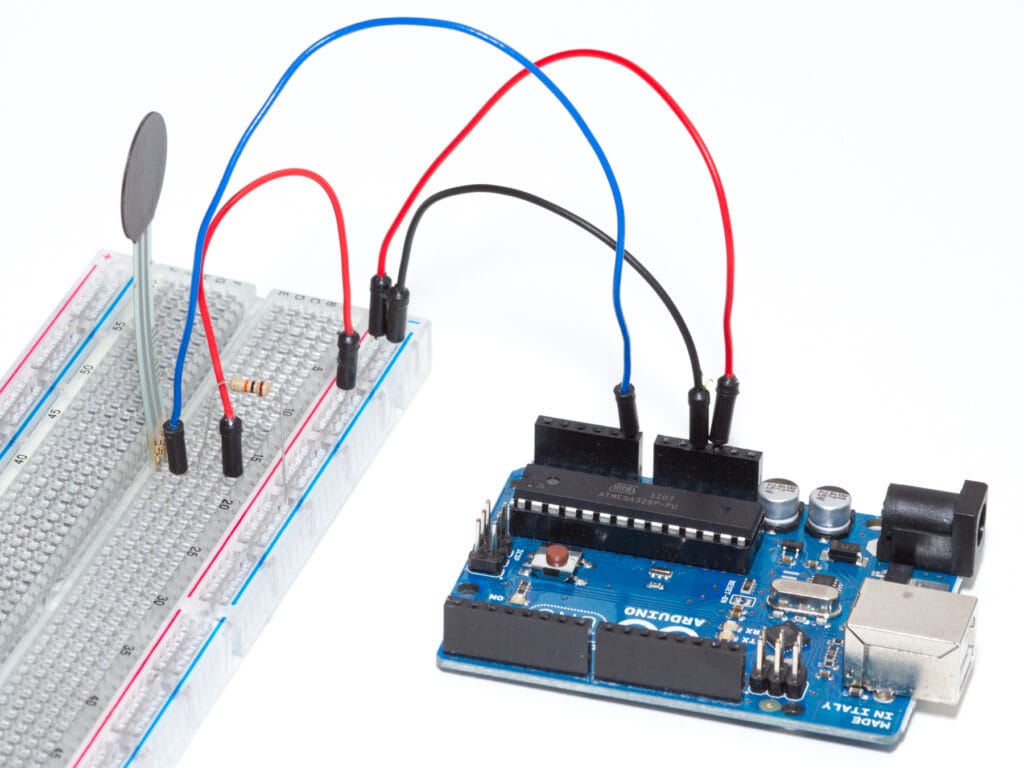
To wire an fsr to an arduino, you need a few things. Get a SOUSHINE force sensitive resistor, a 4.7kΩ resistor, an arduino, jumper wires, a mini breadboard, and some weights. This setup is good for people who are new or have experience.
Follow these steps to set up the circuit:
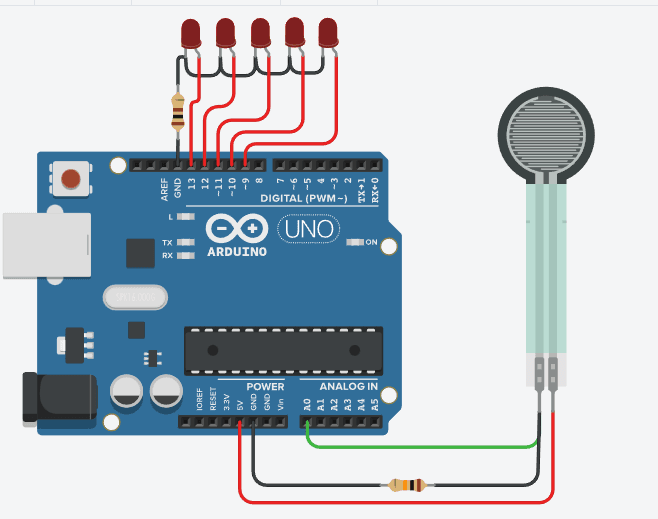
- Put the fsr on the breadboard. The legs go into the slots.
- Connect one fsr leg to the voltage pin on the arduino.
- Attach the other fsr leg to the resistor. Then connect the resistor to the ground pin.
- Link the same fsr leg to an analog input pin on the arduino.
- Make sure all wires are tight. Loose wires can stop it from working.
People do not solder the fsr directly. This keeps it safe. Tabs that fit the breadboard make it easy to use. Some people use screw terminals for a strong hold. IC hooks are good for short tests. Amphenol FCI Clincher connectors work well for long projects.
Tip: Alligator clips can hurt the sensor. Use them only for quick tests.
Be careful when setting up. Push straight down on the sensor head. Keep the sensing area flat. Cover the sensor to keep out water if needed. Use glue only a little and avoid glue that makes gas.
Voltage Divider Explained
The circuit uses a voltage divider to measure force. The voltage divider splits voltage between the fsr and the resistor. The arduino checks the voltage in the middle. This voltage changes when you press the sensor.
People pick resistor values for their needs. Here are some common choices:
| Resistor Value | Application Context |
|---|---|
| 3kΩ | Good starting point for general use |
| 3.3kΩ | Used in many projects |
| 4.7kΩ | Works well for 1kg force readings |
| 10kΩ | Easy to find in parts boxes |
People match the resistor value to the fsr’s middle resistance. This gives the best voltage change for the arduino. They change the resistor to use as much of the 0–5V range as possible. Very low or high resistance can make the voltage curve flat. This lowers sensitivity. People test with resistors like 4.7kΩ, 10kΩ, or 47kΩ. They watch how the readings change with soft and hard presses.
Sometimes the setup has problems. Here are some common issues and fixes:
| Challenge | Explanation |
|---|---|
| Inaccurate Readings | Check connections and calibrate the sensor. |
| No Change in Resistance | Look for damage or disconnected wires. |
| Drifting Values | Temperature can affect readings. Use software to adjust. |
A simple setup helps people get good results. The circuit lets the arduino measure force and pressure easily.
Interfacing Force Sensing Resistor
Microcontroller Setup
Many people use microcontrollers with a force sensitive resistor. The most common ones are:
- Arduino
- Raspberry Pi
- ESP32
Each microcontroller can read fsr measurements easily. Arduino has analog pins built in. Raspberry Pi needs an ads1015 adc to read analog signals. ESP32 has analog pins too.
To connect, users attach the fsr to an analog input. For Raspberry Pi, the fsr connects to the ads1015 adc. The ads1015 adc changes analog signals to digital ones. This lets Raspberry Pi read the force values. The ads1015 adc works with many sensors and gives steady results.
Tip: Always check your wires before turning on the microcontroller. This helps stop mistakes.
Reading Sensor Data
It is easy to read an fsr with the right code. Arduino users write a simple sketch. Raspberry Pi users run a Python script with the ads1015 adc. The ads1015 adc sends fsr measurements to the Raspberry Pi.
Here is a basic Arduino code for reading sensor data:
int fsrPin = 0;
void setup() {
  Serial.begin(9600);
}
void loop() {
  int fsrReading = analogRead(fsrPin);
  Serial.print("Analog reading = ");
  Serial.println(fsrReading);
  delay(100);
}
This code reads the fsr value and prints it. Users see the number change as they press the sensor.
For Raspberry Pi, the ads1015 adc sends the value to the Python script. The script prints the value. Users watch the numbers go up or down with pressure.
The force sensitive resistor’s output signal changes with area and pressure. When there is no force, resistance is very high. With more force, resistance drops into the kiloohms range. The link between force and resistance is almost straight.
Here is a table that shows typical output values:
| Force Applied (N) | Resistance (MΩ) | Resistance (kΩ) |
|---|---|---|
| 0 | High (MΩ range) | N/A |
| Moderate | Low (kΩ range) | N/A |
| High | Saturation | N/A |
People use these numbers to control things or measure force in projects.
Calibration Tips
Calibration helps get correct force readings. It is important to do it often. People use known weights to make a chart of resistance and force. They test the fsr with different weights and write down the resistance. This chart helps match force to what the sensor shows.
Users set up a voltage divider circuit for clear readings. The ads1015 adc helps keep fsr measurements steady. Keep the sensor away from water and heat. This keeps the readings the same.
Here are some calibration steps:
- Use the same weights every time.
- Write down the resistance for each weight.
- Make a chart to compare force and resistance.
- Keep the sensor dry and clean.
- Use the ads1015 adc for better accuracy.
Troubleshooting helps if readings are wrong. People check for water near the sensor. They use a 10k nominal resistance for the fsr. The other resistor should be less than 20k ohm. Adding an op-amp buffer can help accuracy. It stops signal problems and lowers noise.
Note: The ads1015 adc gives better results for small forces and steady readings.
People follow these steps to get the best results from their force sensing projects.
Force Sensitive Resistors Applications
Pressure-Sensitive Button
Lots of people use force sensitive resistors to make special buttons. These buttons are found in smartphones, tablets, and game controllers. When you press the button, the sensor feels the force and sends a signal. This helps devices react fast to your touch. In robots, a pressure-sensitive button helps the robot hold things with the right force. Medical tools use these buttons to watch how patients move or check pressure on beds. The table below lists some common ways people use them:
| Application Area | Example Use Case | Outcome Metrics |
|---|---|---|
| Touch and Pressure-Sensitive UI | Smartphones and tablets for detecting touch | Increased responsiveness |
| Robotics and Prosthetics | Robotic grippers adjusting grip force | Improved efficiency and safety |
| Medical Devices and Wearables | Pressure sensors in patient beds | Better patient care |
| Gaming and Virtual Reality | Controllers detecting finger pressure | More precise control |
| Automotive and Transportation | Smart seats sensing pressure | Enhanced safety |
DIY Weight Scale
You can use a force sensitive resistor to make a simple weight scale at home. The sensor checks the force when you put something on it. The voltage changes as the weight changes. If you put a soft foam on the sensor, it spreads out the pressure and makes the readings steadier. Many people use a raspberry pi or Arduino to read the sensor’s numbers. Calibration is important because each sensor can give different results. Making a chart with known weights helps match the numbers to real weights. This way works for weighing small things, like a milk carton. The scale might be off by about 10%, so you should check and fix it often.
Other Uses
Force sensitive resistors are used in many areas. In healthcare, they help check blood flow and help prosthetic limbs move. Robots use them to feel touch and control how hard they grip. Wearable gadgets use these sensors to track finger or hand movement. Some devices use a pressure sensitive conductive film to record pressure right away. The sensors can go into clothes, making smart clothing possible. SOUSHINE checks every fsr to make sure it lasts long, works the same way each time, and reacts fast. Their products meet ISO and car industry rules, so they work in cars, factories, and even planes. These sensors keep working in hot, cold, or wet places, so they are good for many projects.
Tip: Force sensitive resistors help people make smart, touch-friendly things for everyday use.
Anyone can use a force sensitive resistor by doing three steps. First, connect the fsr and look at the wires. Next, test with weights to get steady readings. Last, write code to read and use the sensor data.
Many people try new projects with SOUSHINE FSRs. They build robots, smart home devices, and wearable tech. Some add other sensors for more features, like temperature or moisture sensing. Beginners think fsr projects are easy and fun.
FAQ
How does someone test if an fsr works?
A person presses the sensor and watches the output change on a screen. If the numbers move when pressed, the fsr works.
Can a raspberry pi read data from a force sensitive resistor?
Yes, a raspberry pi can read data from a force sensitive resistor. It needs an analog-to-digital converter to see the sensor’s values.
What happens if the sensor gets wet?
Water can cause the sensor to stop working. People keep the sensor dry and use covers to protect it.
Is it safe to bend a force sensitive resistor?
People can bend the sensor gently. Too much bending can break it. Always check the sensor after bending.
How long does a force sensitive resistor last?
Most sensors last for thousands of presses. People get steady results if they use the sensor carefully.