Call us: +86-137-2353-4866

The best force sensor arduino choices in 2025 use new force sensing resistors. These resistors help projects get steady and exact results. Picking the right force sensor lets users collect good data for robotics, healthcare, and electronics. Force sensing is very important in how today’s devices work. SOUSHINE is a top brand because it has new technology, special shapes, and sensors for many needs.
Table of Contents
Key Takeaways
- Pick the best force sensor for your project. This helps you get correct data in robotics, healthcare, and electronics.
- SOUSHINE sensors are liked because they bend, react fast, and last long. They work well in many uses.
- Interlink 408 is easy for beginners and good for DIY projects. It has a long area to sense pressure.
- Ezweiji FSR is cheap and can be used in many ways. It is good for simple force checks and comes in different shapes.
- The Thin Film Pressure Sensor SF15-150 fits in small spaces and gives quick feedback. It is great for interactive projects.
- Honeywell sensors are strong and very accurate. They are a good pick for hard jobs.
- Good wiring and calibration are needed for correct sensor readings. Always check your wires and use known weights to set up the sensor.
- Use help from forums and guides to learn more and fix problems with force sensors.
Top Extra-Long Force-Sensitive Resistor Picks
Picking the right force sensor arduino really matters for your project. Here are some extra-long force-sensitive resistors you can use in 2025. These choices are popular because of their features and how well they work with Arduino. People also like them based on reviews.
SOUSHINE Force Sensing Resistor
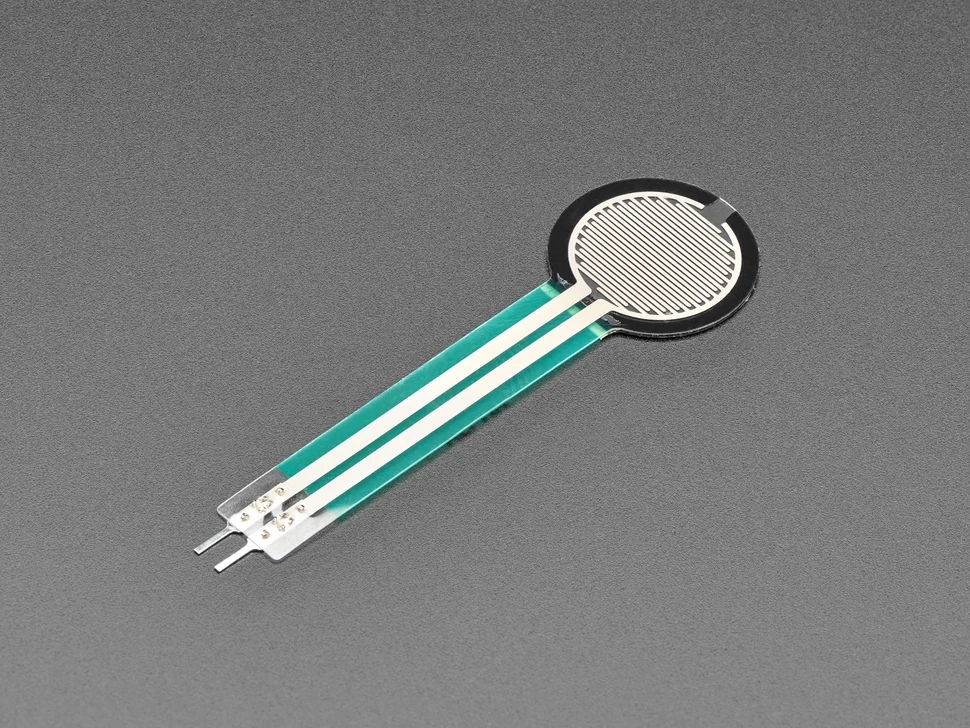
Features
SOUSHINE has a force-sensitive resistor that works with many Arduino boards. It uses new technology to measure force and pressure. The sensor is made with a bendy base, a spacer, and a layer that carries electricity. This design lets it react fast when force changes.
| Feature | Specification |
|---|---|
| Max Force Detection | up to 22lbs (up to 10N) |
| Actuation Force | 0.1N |
| Force Sensitivity Range | 0.1 – 10.02 Newtons |
| Single Part Force Repeatability | ± 2% |
| Resolution | Continuous |
| Non-Actuated Resistance | 10M W |
| Operating Temperature | -30 – +70 ºC |
| Number of Actuations | 10 Million tested without failure |
- Sticky back makes it easy to put on things
- Thickness is between 0.2 and 1.25 mm
- Hysteresis is about +/- 10%
- Device reacts in less than 3 microseconds
Pros and Cons
SOUSHINE’s force sensing resistor saves money and can be changed to fit. It comes in many shapes and sizes. The sensor lasts a long time and works in hard places. It does not use much power, so it saves energy.
Best Applications
- Robotics: Lets robots feel touch.
- Healthcare: Used in devices to watch patients.
- Consumer electronics: Makes touch controls possible.
- Industrial automation: Checks pressure in machines.
User Insights
People say SOUSHINE’s force-sensitive resistor is simple to use with Arduino. Many like that it gives the same results again and again. Some say it reacts very fast, which is great.
Interlink 408
Features
Interlink 408 is a force-sensitive resistor that can feel pressure, squeeze, and weight. Its sensing part is 1/4-inch wide and 24 inches long. The sensor’s resistance changes when you press on it.
| Feature | Specification |
|---|---|
| Actuation Force | as low as 0.1 N |
| Sensitivity Range | up to 10 N |
| Thickness | 0.40 mm |
| Actuations | up to 10 million |
- Works easily with Arduino
- Not expensive
- Simple to use with breadboards or clamp connectors
Pros and Cons
Interlink 408 is easy and works well. It does not give exact weight numbers, but it is good for feeling force. Soldering is not a good idea unless you know how.
Best Applications
- Robotics: Feels touch and grip.
- DIY electronics: Adds pressure sensing to projects.
- Education: Good for learning about force-sensitive resistors.
User Insights
People like Interlink 408 because it is easy to use. Many think it is great for beginners. Its long sensing part helps with projects that need more length.
Ezweiji FSR
Features
Ezweiji FSR is another force-sensitive resistor that works with Arduino. You can get it in many sizes and shapes. The sensor gives the same force readings every time and does not cost much.
- Gives the same readings again and again
- Easy to change size and shape
- Simple to use
- Thickness is between 0.2 and 1.25 mm
Pros and Cons
Ezweiji FSR does not cost much and is easy to use. It fits many different projects. The sensor is easy to connect and works well for simple force checks.
Best Applications
- Consumer electronics: Adds touch control.
- Robotics: Feels grip and pressure.
- Industrial uses: Watches force in machines.
User Insights
People say Ezweiji FSR works well for simple force checks. Many like that you can get it in different sizes and shapes. It is a favorite for people who want a basic force-sensitive resistor.
Thin Film Pressure Sensor SF15-150
Features
The Thin Film Pressure Sensor SF15-150 is one of the best extra-long force-sensitive resistors. It has a thin film that reacts when you press on it. This sensor works with Arduino boards. It can fit into small spaces. The sensor can measure many different force levels. It gives steady readings every time.
| Feature | Specification |
|---|---|
| Sensing Area | 15mm x 150mm |
| Force Range | 0.2N to 20N |
| Thickness | 0.3mm |
| Response Time | Less than 5ms |
| Repeatability | ±3% |
| Operating Temperature | -20°C to +60°C |
- Very thin and bends easily
- Simple to put on flat things
- Works with lots of microcontrollers
Pros and Cons
The Thin Film Pressure Sensor SF15-150 gives fast feedback and fits in small spots. People like that it bends and is easy to set up. Some say it is not good for heavy loads compared to other force-sensitive resistors.
Best Applications
- Robotics: Senses touch and grip.
- Consumer electronics: Adds pressure to buttons.
- Industrial automation: Checks pressure in machines.
User Insights
People say the SF15-150 is great for projects that need a thin sensor. Many like how simple it is to connect to Arduino boards. Some say it gives good results for light and medium force sensing.
Honeywell Force Sensor
Features
Honeywell makes a force-sensitive resistor that many companies use. This sensor is strong and gives correct force readings. It works with force sensor arduino setups. It fits into many devices.
| Feature | Specification |
|---|---|
| Sensing Area | 12mm x 100mm |
| Force Range | 0.1N to 15N |
| Thickness | 0.5mm |
| Response Time | Less than 2ms |
| Repeatability | ±2% |
| Operating Temperature | -40°C to +85°C |
- Tough and lasts a long time
- Works in hard places
- Easy to connect to microcontrollers
Pros and Cons
Honeywell’s force-sensitive resistor gives steady results and lasts a long time. Many people trust its accuracy. Some say it costs more than other sensors, but they think it is worth it.
Best Applications
- Healthcare: Used in devices to watch patients.
- Robotics: Helps robots feel touch.
- Industrial automation: Measures force in machines.
User Insights
People say Honeywell’s sensor is good for projects that need to be very exact. Many like that it is strong and reacts fast. Some say it is a smart pick for things that need to last a long time.
Force Sensor Arduino Integration
It is not hard to connect a force sensor arduino. Most force sensing resistor models work with Arduino boards. These sensors need only a few wires and parts. Many people pick them because they give good readings and react fast.
Wiring and Setup
First, look at the sensor’s pins. Most force sensing resistor types have two pins. Connect one pin to an analog input on the Arduino. The other pin goes to ground. Put a pull-down resistor between the analog input and ground. This helps the Arduino see changes when you press on the sensor.
Tip: Use jumper wires and a breadboard. This makes it easy to change things while testing.
Some problems can happen when setting up sensors:
- Calibration problems can make readings wrong. Always set a starting point before you take readings.
- Loose wires can make the data bad.
- Changes in temperature can change readings, so you may need to set it again.
Coding and Libraries
Arduino works with many force sensors using simple code. The Arduino IDE has tools to read analog values. Some sensors have libraries that help with coding. To start, write a sketch that reads the analog pin and prints the value. This lets you see how the sensor changes with force.
Here is a simple code example:
int sensorPin = A0;
int sensorValue = 0;

void setup() {
  Serial.begin(9600);
}

void loop() {
  sensorValue = analogRead(sensorPin);
  Serial.println(sensorValue);
  delay(100);
}
This code reads the sensor and shows the number. You can add steps to set the sensor or match the readings to real force values. Libraries from force sensor makers can help you change how sensitive the sensor is.
Troubleshooting
Sometimes, sensors do not show the right numbers. You can fix most problems with a few steps. The table below shows some things you can try:
| Step | Description |
|---|---|
| 1 | Print the raw numbers from the A/D converter to check the sensor. |
| 2 | Look at the wires to make sure everything is connected right. |
| 3 | Set the load cell with known weights to get good readings. |
To set up a sensor:
- Get weights that match the force you want to measure.
- Put each weight on the sensor and write down the number.
- Find the calibration factor by dividing the weight by the number.
- Change the Arduino code to use this factor.
Sensors last longer if they are made well. If you follow these steps, you will get better and more steady data.
Why Choose These Force Sensors
Reliability
People want sensors that work all the time. These force sensors keep working after lots of use. SOUSHINE, Interlink, Ezweiji, SF15-150, and Honeywell are known for being reliable. Many people trust them for big projects. The table below shows what they can do and where they are used:
| Brand | Key Features | Applications |
|---|---|---|
| SOUSHINE | Flexible, strong, thin (0.85mm), quick response (<0.015ms), wide temperature range (-40°C to +85°C), measures small forces (10g to 1000g) | Motion systems, car sensors, medical tools, precise force measurement |
| Interlink | Many shapes and sizes, affordable, fits many uses | Cars, robots, hospitals, electronics |
These sensors can handle millions of presses. They are tough and work well in hard places like cars and factories. Most companies test their sensors to make sure they last a long time.
Accuracy
It is important to measure force the right way. All the force sensing resistors here give steady numbers. SOUSHINE sensors react very fast, in less than 0.015 milliseconds. This helps people get data right away. Honeywell and Interlink also give good readings. People use them in medical tools and robots because they trust the numbers.
Sensors that are very sensitive help people see small changes in force. This is good for projects that need careful control, like in healthcare or robots. Many people say these sensors help them not make mistakes in their force sensor arduino projects.
Flexibility
Flexibility is not just about bending. These sensors work for many kinds of projects. SOUSHINE and Ezweiji have sensors in lots of shapes and sizes. Interlink and SF15-150 also give choices for different lengths and widths. This helps people pick the best sensor for their project.
People can put these sensors in small or curved spaces. Many sensors work with more than just Arduino. This makes them easy to use in new things. People like that one sensor can do many jobs, from robots to smart gadgets.
Tip: Try different sensor shapes to find what works best for you.
These sensors let people try new ideas. Their flexibility saves time and money because you do not need to buy lots of different parts.
Community Support
Many people use Arduino force sensors and want help. The community gives lots of ways to learn and fix problems. Makers, students, and engineers share tips and ideas online. They ask questions and answer each other on forums and social media. People also post videos to help others.
Users can find guides for SOUSHINE, Interlink, Ezweiji, SF15-150, and Honeywell sensors. These guides show how to connect wires and write code. They also help with fixing common problems. Many people upload videos with steps you can follow. Some write blogs with pictures and drawings. This support helps new users start projects and not feel confused.
Tip: Look up sensor names on YouTube or Arduino forums. You will find real project examples and ways to fix problems.
Here is a table of popular places to get help:
| Platform | Type of Support | Example Topics |
|---|---|---|
| Arduino Forum | Q&A, guides, code | Wiring, calibration |
| Discussions, feedback | Sensor choices, fixes | |
| YouTube | Video tutorials | Setup, project demos |
| GitHub | Code libraries | Sample sketches, updates |
| Maker Blogs | Step-by-step guides | Integration, reviews |
People join online groups to talk about their projects. They ask questions and get answers from others who use the same sensors. Some share code that works with different sensor models. Others post pictures of finished projects. This sharing helps everyone learn faster.
Users help each other when there are problems. If someone has trouble with sensor readings, others give ideas to fix it. They talk about calibration, wiring, and code changes. Working together makes it easier to solve problems and finish projects.
Many sensor brands like SOUSHINE help on their websites. They post datasheets, wiring diagrams, and sample code. Some brands answer questions by email or chat. This direct help adds to what the community gives.
Note: When people share project results, others learn from mistakes and wins. This makes the whole group stronger.
Community support helps users feel ready to try new things. They see what others have made and want to start their own projects. Sharing tips, code, and advice helps everyone do better with Arduino force sensors.
Force Sensitive Resistor Selection Guide
Sensitivity and Range
When you start a project with Arduino, you need to know what the sensor can measure. Sensitivity means how small a force the sensor can feel. Range tells you the smallest and biggest force it can handle. Most force-sensitive resistors for Arduino can sense both light touches and hard presses.
Here is a table with common sensitivity and range values for these sensors:
| Specification | Value |
|---|---|
| Resistance Range | Over 10 MΩ (no pressure) to about 200 Ω (max pressure) |
| Force Sensitivity | 100 grams to 10 kilograms |
| Actuation Force | About 0.1N minimum |
| Force Sensitivity Range | About 0.1N to 100N |
A sensor with low actuation force can feel even a soft touch. This is good for things like touch buttons or light pads. A big force range lets the sensor work in many places, from soft controls to heavy loads.
Tip: Always look at the sensor’s datasheet to check its sensitivity and range before you buy it.
Durability
Durability means how long the sensor works after being pressed many times. In Arduino projects, people want sensors that last a long time. Most force-sensitive resistors can handle up to 1 million presses or more. This makes them a smart pick for projects that need sensors to last.
- Many sensors can be pressed 1 million times.
- Some types last even longer, depending on how you use them.
- Sensors made with strong materials last longer in tough spots.
A sensor that lasts a long time is good for robots, games, or machines used every day. People do not want to change sensors often, so picking a tough one saves time and money.
Integration Ease
People like sensors that are easy to connect and use. Most force-sensitive resistors have two pins. You can put them in a breadboard or solder wires to them. These sensors work with many Arduino boards. You do not need special tools or hard steps.
- Simple wiring: Connect one pin to an analog input and one to ground.
- No extra parts: Most setups only need a pull-down resistor.
- Fast setup: Most people can get a sensor working in just a few minutes.
Note: Brands like SOUSHINE give guides and sample code to help you start fast.
Picking the right force sensor depends on how easy it is to add to your project. If a sensor is simple to wire and code, you can spend more time building and less time fixing problems.
Price and Value
Price matters when someone picks a force sensor for Arduino. People want sensors that fit their budget and give good results. Some sensors cost less and work well for simple projects. Others cost more but offer extra features or last longer.
Here is a table that shows price ranges and what users get:
| Sensor Model | Price Range | What You Get |
|---|---|---|
| SOUSHINE FSR | $8 – $15 | Custom shapes, high repeatability |
| Interlink 408 | $10 – $18 | Long sensing area, easy setup |
| Ezweiji FSR | $6 – $12 | Many sizes, basic force sensing |
| SF15-150 | $12 – $20 | Thin design, fast response |
| Honeywell Force Sensor | $18 – $30 | Strong build, high accuracy |
People should think about value, not just price. A sensor that lasts longer or gives better readings can save money over time. SOUSHINE offers sensors with many options, so users can pick what fits their needs. Ezweiji works for basic tasks and costs less. Honeywell costs more but gives strong performance.
Tip: Buy sensors in packs for better deals if the project needs more than one.
Choosing the Right Force Sensor
Choosing the right force sensor helps a project work well. People should look at what their project needs before buying. Here are some things to check:
- Project type: Is it for robots, healthcare, or games?
- Force range: Does the sensor need to measure light touches or heavy presses?
- Size and shape: Will the sensor fit in the space?
- Durability: Will the sensor last for many uses?
- Price: Does the sensor fit the budget?
People also need to pick the right resistor value for better sensitivity. For higher forces, a lower known resistance works best. For lower forces, a higher known resistance helps. Many users choose a 4.7kΩ resistor when testing with weights around 1kg.
Force sensors for Arduino work like a scale. They give readings from 0 to 255. These numbers show how much force is on the sensor. No touch gives a low number. Light touch gives a middle number. Hard touch gives a high number.
Note: Always check the sensor’s datasheet for details about force range and wiring.
People should test the sensor before using it in a final project. Try different resistor values to see which gives the best results. If the sensor does not fit, look for another shape or size.
A good sensor choice makes the project easier and gives better data. SOUSHINE and other brands offer many options, so users can find what works best for them.
In-Depth Reviews
SOUSHINE FSR Review
SOUSHINE’s force sensing resistor is popular in Arduino projects. It has a bendy base and a layer that carries electricity. This design lets it react fast to force changes. You connect it to Arduino with just two wires. The sensor works in robots, healthcare, and electronics.
People like that it gives the same results every time. It can handle millions of presses without breaking. Many say it saves power because it does not use much energy. The sticky back makes it simple to put on things. Its thin shape helps it fit in small spaces.
Tip: Use SOUSHINE FSR in a robot hand. It helps the robot feel how hard it grips.
Here is a table with important details:
| Feature | Value |
|---|---|
| Max Force | 22 lbs |
| Response Time | <3 µs |
| Thickness | 0.2-1.25 mm |
| Actuations | 10 million |
SOUSHINE’s FSR is good for many uses. Its bendy and strong build makes it a favorite for makers.
Interlink 408 Review
Interlink 408 has a long area that senses force. It can measure force along its whole length. People use it for DIY projects and learning. You can connect it to Arduino with two pins. It is easy to set up.
Users say Interlink 408 is great for beginners. It fits breadboards and clamp connectors. You do not need special tools to use it. Many people start with this sensor. It works for touch and grip sensing.
Note: Interlink 408 does not show exact weight. It only shows when force changes.
Key features are:
| Feature | Value |
|---|---|
| Length | 24 inches |
| Thickness | 0.40 mm |
| Actuations | 10 million |
| Sensitivity | up to 10 N |
Interlink 408 works in many projects. Its long shape is helpful for robots and displays.
Ezweiji FSR Review
Ezweiji FSR comes in many shapes and sizes. It works with Arduino boards. People like that it is easy to set up. The sensor gives the same force reading each time. It costs less than other sensors.
People use Ezweiji FSR for simple force checks. It fits in small devices. You connect it with two wires. Many say it is easy to change the size for different projects.
Tip: Ezweiji FSR is good for touch pads and simple pressure controls.
Here is a quick look at its features:
| Feature | Value |
|---|---|
| Thickness | 0.2-1.25 mm |
| Sensitivity | 0.1N min |
| Price Range | $6-$12 |
Ezweiji FSR works for many uses. Makers pick it because it is cheap and easy to use.
SF15-150 Review
The Thin Film Pressure Sensor SF15-150 is special for Arduino projects. Makers like that it is very thin and reacts fast. This sensor fits in small spaces and works well for touch jobs.
SF15-150 reacts quickly when you press it. It gives feedback in less than 1 millisecond. This helps people see changes right away. The sensor goes back to normal in under 15 milliseconds. People use it when they need fast and steady force readings.
Here is a table with the main performance facts for SF15-150:
| Performance Index | SF15-150 |
|---|---|
| Range | 0-5 kg |
| Thickness | <0.35 mm |
| Response Point | 50 g |
| Repeatability | <+10% (60% loaded) |
| Consistency | +15% batch of same model |
| Hysteresis | +15% (RF+ – RF-)/RF+ |
| Durability | >1 million times |
| Initial Resistance | >10MΩ (non-loaded) |
| Response Time | <1 ms |
| Resume Time | <15 ms |
| Test Voltage | DC 3.3V |
| Operating Temperature | -20°C to 60°C |
| EMI | Nothing produced |
| ESD | Not sensitive |
Users say SF15-150 is simple to set up. It works with DC voltage from 3.3V to 5V. The sensor can feel light touches and heavy presses up to 5 kilograms. Its thin shape, less than 0.35 mm, lets it fit on flat or small things.
People like that it lasts a long time. It keeps working after more than a million presses. The sensor does not make electromagnetic noise. It is safe from static electricity. This makes it good for many electronics projects.
Here are some features users talk about most:
- Very sensitive and reacts fast.
- Works in cold and hot places from -20°C to 60°C.
- Handles over a million presses without problems.
- Easy to wire to Arduino boards.
Tip: Makers use SF15-150 in robots, smart buttons, and pressure pads. Its fast reaction is great for interactive projects.
Users say the sensor gives steady numbers. It stays within 10% repeatability at 60% load. The sensor’s accuracy is about ±2.5% for most of its range. This helps people trust the sensor’s data.
SF15-150 works in many projects. Its thin build and quick response make it a top pick for touch devices and pressure controls. Makers choose it when they need a sensor that is fast and reliable.
Comparison Table
Specs Overview
Choosing a force sensor for Arduino means looking at the specs. Each sensor has its own strengths. Here is a quick look at the main specs for popular models:
| Sensor Model | Sensing Area | Force Range | Thickness | Response Time | Repeatability |
|---|---|---|---|---|---|
| SOUSHINE FSR | Customizable | 0.1N–10N | 0.2–1.25mm | <3µs | ±2% |
| Interlink 408 | 24″ x 0.25″ | up to 10N | 0.40mm | <5ms | ±3% |
| Ezweiji FSR | Various | 0.1N–10N | 0.2–1.25mm | <5ms | ±3% |
| SF15-150 | 15mm x 150mm | 0.2N–20N | 0.3mm | <1ms | ±10% |
| Honeywell | 12mm x 100mm | 0.1N–15N | 0.5mm | <2ms | ±2% |
Tip: Check the sensor’s datasheet before starting your project. Specs help you match the sensor to your needs.
Pros and Cons
Every sensor has good points and some limits. Here is a table that shows what each model does best and where it might not fit:
| Sensor Type | Pros | Cons |
|---|---|---|
| SOUSHINE | Works well in clean environments | May lack special features for complex tasks |
| Interlink 408 | Easy to use, fits many projects | Not for high-precision jobs |
| Ezweiji FSR | Low cost, flexible shapes | Limited accuracy for advanced needs |
| SF15-150 | Thin, fast response | Not for heavy loads |
| Honeywell | Strong build, high accuracy | Higher price |
Many users say SOUSHINE sensors work well for simple and steady jobs. Interlink and Ezweiji fit basic projects. Honeywell stands out for tough jobs that need exact force readings.
Best Use Cases
Force sensors help in many ways. Here are some top use cases for Arduino projects:
| Application Type | Integration Example | Description |
|---|---|---|
| Pressure Switch | FSRs sense when you press | Devices turn on when you press hard enough |
| Smart Scale | FSRs check weight | Scale shows weight by sensing force |
| Game Controller | FSRs detect button presses | Games respond to how hard you press |
- SOUSHINE FSR fits robotics, healthcare, and smart gadgets.
- Interlink 408 works in learning kits and DIY builds.
- Ezweiji FSR helps with touch pads and simple controls.
- SF15-150 fits thin devices and quick touch jobs.
- Honeywell sensors go into medical tools and factory machines.
Makers pick sensors based on what their project needs. Some want fast response. Others need strong build or low price.
Installation Tips
Proper Wiring
Wiring your force-sensitive resistor to Arduino is important. Most people use the FSR and a fixed resistor together. This makes a voltage divider. The middle spot between them goes to an analog pin. The other ends go to power and ground.
Here’s how you can wire an FSR:
- Put the FSR and a resistor in a line.
- Connect one side of the FSR to 5V on Arduino.
- Connect the other side of the FSR to one side of the resistor.
- Attach the other side of the resistor to ground.
- The spot where the FSR and resistor meet goes to an analog pin.
| Wiring Method | Resistor Used | Notes |
|---|---|---|
| 9V Battery | 470Ω | Add a backup resistor to keep the LED safe |
| 5V from Arduino | N/A | FSR resistance usually keeps the circuit safe |
- Always use a resistor to make a voltage divider.
- The analog pin sees more voltage when you press harder.
- If you do not press, the FSR acts like it is off, so voltage is low.
Picking the right resistor is important. A 4.7kΩ resistor works for about 1kg of force. If you want to sense bigger forces, use a smaller resistor.
Tip: Check your wiring before turning on Arduino. This helps stop mistakes and keeps the sensor safe.
Calibration
Calibration makes your sensor give better numbers. Most people use weights and a flat table for this. Put a weight on the FSR and write down the number. Try this with different weights. Write each number down.
The link between force and resistance is not always even. Many people draw their data on a log-log graph to see a straight line. This helps match the sensor’s numbers to real force. For a 1kg weight, the error is about ±200g. This is good enough for most projects.
Note: Use the same spot and way each time you calibrate. This keeps your results the same.
Common Mistakes
Many new users make the same errors with force sensors. Here are some mistakes and how to stop them:
- Not picking the right data type in code can make weird numbers.
- If you forget serial communication, you cannot read messages.
- Not adding debouncing for switches can give wrong numbers.
- If you do not check sensor values first, your code might crash.
- Not setting pin modes with
pinMode(pin, mode)can make things not work. - Using the wrong pin or setting pins wrong causes problems.
- Not reading the board’s guide can cause pin limit mistakes.
Tip: Always check your code and wiring. Small errors can cause big problems later.
If you follow these tips, you can set up your force sensor fast and skip common problems. Good wiring, careful calibration, and paying attention help every Arduino project work well.
Real-World Applications
Robotics
Robots need to feel touch and pressure to work well. Force sensors help robots pick things up without breaking them. These sensors also let robots know if they bump into something. Many robot arms use force-sensitive resistors to control how hard they grip. This helps robots hold breakable things like eggs or glass.
Mobile robots use force sensors to know when they hit a wall or object. This feedback helps the robot stop or turn away. Some robots have these sensors in their feet to help them balance. Makers like SOUSHINE FSRs because they bend and react fast. These sensors fit in tight spots and moving parts.
Robotics teams use force sensors in contests. They build robots that sort things by weight. Students learn to program robots to react to different forces. This hands-on work helps them see how machines sense things.
Tip: Put a force sensor on a robot hand. It can help the robot hold things with just enough pressure.
Healthcare
Force sensors are important in healthcare tools. They help doctors and nurses watch patients safely. Many devices use force-sensitive resistors to check pressure on skin or in tools.
Some common uses are:
- Healthcare skin pressure detector: This tool uses a force-sensitive resistor to check skin pressure. It connects to an Arduino UNO, LCD, and LEDs. The screen shows pressure levels right away. Nurses use this to stop bedsores in patients who stay in bed.
- Smart rehab tools: These tools track how much force a patient uses in exercises. The data helps doctors change therapy plans.
- Patient monitoring mats: These mats sense when a patient moves or gets up. The system tells staff if someone needs help.
Force sensors make healthcare tools smarter and safer. They give feedback right away, so caregivers can act fast.
Consumer Electronics
Many gadgets we use every day have force sensors. Touchpads in laptops and tablets often use force-sensitive resistors. These sensors let people control devices with soft or hard presses. Game controllers use them to sense how hard you press a button, which changes what happens in the game.
Smartphones sometimes use force sensors for screens that feel pressure. This lets users open menus or change settings with different touches. Wearable devices, like smartwatches, use force sensors to count steps or check grip strength.
Companies pick force sensors because they are thin and easy to put in small gadgets. They also use little power, so batteries last longer. People like gadgets that react fast and feel easy to use.
Note: Force sensors help make gadgets more fun and interactive. They turn simple touches into helpful actions.
Industrial Automation
Factories and warehouses use force sensors to make machines smarter. These sensors help machines know when to start, stop, or change what they do. Workers use them to check if a machine presses hard enough or if a part is in the right spot. Many companies pick force-sensitive resistors (FSRs) like SOUSHINE because they work well with Arduino boards.
In a factory, a conveyor belt moves boxes. A force sensor sits under the belt. When a box passes over the sensor, it checks the weight. If the box is too light or too heavy, the system can stop the belt or send the box to another line. This keeps products safe and helps workers spot mistakes fast.
Robotic arms in factories also use force sensors. The sensor tells the robot how much pressure it uses to grab or move an object. If the robot grips too hard, it might break something. If it grips too soft, it could drop the item. The force sensor helps the robot get it right every time.
Here are some ways force sensors help in industrial automation:
- Quality control: Sensors check if machines press, cut, or stamp with the right force.
- Safety systems: Machines stop if they sense too much force, keeping workers safe.
- Sorting: Sensors help sort items by weight or pressure.
- Maintenance: The system can spot worn-out parts by changes in force readings.
Tip: Use a force sensor to track machine wear. If the force needed to move a part changes, it might be time for a repair.
A table shows how different force sensors fit in factory jobs:
| Task | Sensor Role | Example Sensor |
|---|---|---|
| Box sorting | Checks box weight | SOUSHINE FSR |
| Robot gripping | Measures grip strength | Interlink 408 |
| Press machines | Monitors pressing force | Honeywell Sensor |
| Conveyor safety | Detects jams or overloads | SF15-150 |
Many engineers like FSRs because they are thin and easy to place in tight spots. They use little power, so machines can run longer without stopping. FSRs also last through many presses, which is good for busy factories.
Some companies use force sensors to count how many times a machine moves. Others use them to make sure each product gets the same treatment. This helps keep quality high and waste low.
Force sensors make factories run better. They help machines work on their own and let workers fix problems before they get big. With brands like SOUSHINE, engineers can pick the right sensor for each job.
Arduino users can pick from many good force sensors. SOUSHINE, Interlink, Ezweiji, SF15-150, and Honeywell all have special things they do well. Makers should look at what each sensor does before picking one for their project. They can count on SOUSHINE and other top brands to work well. People can also look for new sensor ideas and tell others about their own projects.
FAQ
What is a force-sensitive resistor (FSR)?
A force-sensitive resistor changes how much it resists electricity when pressed. People use FSRs to check force or pressure in lots of projects. Arduino boards can read these changes to get data.
Can you use any FSR with Arduino?
Most FSRs work with Arduino boards. You only need to connect two wires and use easy code. Always look at the sensor’s datasheet for voltage and wiring info.
How do you connect an FSR to Arduino?
Connect one pin of the FSR to an analog input. The other pin goes to ground. Add a resistor to make a voltage divider. This helps Arduino see force changes.
Do you need to calibrate a force sensor?
Yes, calibration makes the sensor give correct numbers. Put known weights on the sensor and write down the values. Use these numbers to match the sensor’s output to real force.
What projects use force sensors?
People use force sensors in robots, smart gadgets, medical tools, and games. These sensors help devices feel touch, measure grip, or check pressure.
How long do FSRs last?
Most FSRs last through millions of presses. Brands like SOUSHINE test their sensors to make sure they are strong. Users can expect them to last a long time in normal projects.
Can you reuse a force sensor in different projects?
Yes, you can use FSRs in new projects. Just take out the sensor and connect it to something else. Be gentle so you do not break it.